Prepare to Take Your Measurement
Before beginning, make sure your software is installed and your myDAQ Student Data Acquisition Device is configured. If you have not completed this yet, visit Setting Up Your NI myDAQ.
For this measurement, you need your NI myDAQ Student Data Acquisition Device with USB cable and DMM probes and a battery (for example a AA or AAA battery).

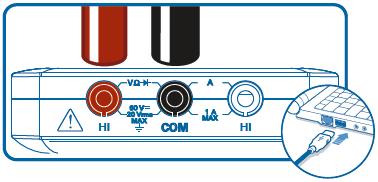
First, connect the red DMM probe to the HI V input and the black DMM probe to the COM input on your myDAQ Student Data Acquisition Device. If you have not already done so, use the USB cable to connect your Student Data Acquisition Device to your computer.

DO NOT plug DMM probes into circuits with hazardous voltage, such as wall outlets. READ the NI myDAQ User Guide and Specifications prior to myDAQ Student Data Acquisition Device use.
Digital Multimeter

Next, from the NI ELVISmx Instrument Launcher, select DMM to launch the digital multimeter instrument. If the instrument launcher is not already open, go to Start»All Programs»National Instruments»NI ELVISmx for NI ELVIS & NI myDAQ»NI ELVISmx Instrument Launcher.

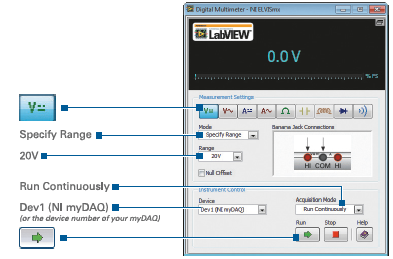
Once the ELVISmx DMM instrument is open, select your device. This is Dev 1 (NI myDAQ) or the device number of your Student Data Acquisition Device. Then change the range to 20 V or a value greater than the voltage value you are trying to measure. For this measurement, you use the default values for the rest of the settings, so you should not have to change anything else. But to be safe, make sure that the measurement type is DC voltage, the mode is Specify Range, and the Acquisition mode is Run Continuously.

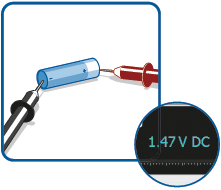
Once you have made these selections, press the green run arrow button. Touch the red DMM probe to the positive battery terminal while touching the black DMM probe to the negative battery terminal. You should see the DMM reading change to a value close to the battery's voltage rating. For example, a AAA battery should give a reading of around 1.5 V. Once you have taken your reading, hit the Stop button.