Before proceed, you can check the operating system of your Real-Time target from Real-Time Controllers and Real-Time Operating System Compatibility.
Installation
To set up Eclipse with the appropriate GCC C cross-compiler for your embedded system follow the instructions in
Getting Started with C/C++ Development Tools for NI Linux Real-Time, Eclipse EditionIf you are compiling
.so model for VeriStand, make sure you have installed NI VeriStand Model Framework. Refer to
How Do I Install the NI VeriStand Model Framework?
Creating a C/C++ Project
- Launch C/C++ Development Tools for NI Linux Real-Time, Eclipse Edition.
- When prompted, select a folder in which to store Eclipse projects and click OK.
- In the Eclipse welcome screen, select the Workbench icon on the far right to open the workbench view.
- Create a new project in the C/C++ perspective by navigating to File>>New>>C Project and choosing a Shared Library project and the Cross GCC Toolchain.
- Select both Debug and Release configurations for creation.
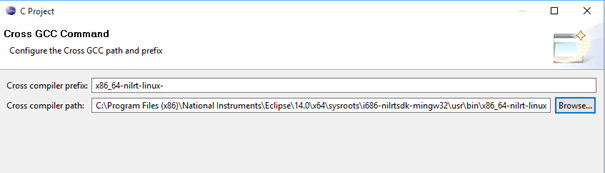
- When prompted to configure the Cross GCC prefix and path, select the appropriate path and prefix for your NI Linux Real-Time target from the list below and displayed in the following screenshot for an Intel x64 target:
Prefix:
(ARM-based targets, 2013 software stack) arm-none-linux-gnueabi-
(ARM-based targets, 2014 and 2017 software stack) arm-nilrt-linux-gnueabi-
(Intel x64-based targets, 2014 and 2017 software stack) x86_64-nilrt-linux-
Path:
(ARM-based targets, 2013 software stack) \<National Instruments>\Eclipse\toolchain\gcc-4.4-arm\i386\bin
(ARM-based targets, 2014 software stack) \<National Instruments>\Eclipse\14.0\arm\sysroots\i686-nilrtsdk-mingw32\usr\bin\armv7a-vfp-neon-nilrt-linux-gnueabi
(ARM-based targets, 2017 software stack) C:\build\17.0\arm\sysroots\i686-nilrtsdk-mingw32\usr\bin\arm-nilrt-linux-gnueabi
(Intel x64-based targets, 2014 software stack) \<National Instruments>\Eclipse\14.0\x64\sysroots\i686-nilrtsdk-mingw32\usr\bin\x86_64-nilrt-linux
(Intel x64-based targets, 2017 software stack) C:\build\17.0\x64\sysroots\i686-nilrtsdk-mingw32\usr\bin\x86_64-nilrt-linux
- If the source folder does not exist, right-click your project folder and select New>>Source Folder. Then import your .c file by right-clicking on your source folder and choosing Import. Select General>>File System, then browse to the directory of the existing C code to import .c file.
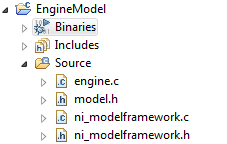
- When completed, your Project Explorer pane should look like the screenshot below. In this example engine.c is the C File we want to compile into a .so file. If you are compiling the .so file for a Veristand model, you need to include ni_modelframework.c and ni_modelframework.h. Refer to Introduction to NI VeriStand Model Framework for the location of components.
- Right-click your project in the Project Explorer tab and select Properties.
- Select C/C++ Build in the left pane of the Properties window. Under Builder Settings tab, select Internal builder from the Builder type pull-down menu.
- Select Settings under C/C++ Build in the left pane of the Properties dialog box. Under Tool Settings tab, navigate to Cross GCC Compiler>>Miscellaneous. In the Other flags text box, add a space after the existing text and enter one of the following values:
(ARM-based targets, 2017 software stack) --sysroot=C:\build\17.0\arm\sysroots\cortexa9-vfpv3-nilrt-linux-gnueabi
(Intel x64-based targets, 2017 software stack) --sysroot=C:\build\17.0\x64\sysroots\core2-64-nilrt-linux
- Under Tool Settings tab, navigate to Cross GCC Linker >> Miscellaneous. Enter one of the following values into the Linker flags text box:
(ARM-based targets, 2017 software stack) --sysroot=C:\build\17.0\arm\sysroots\cortexa9-vfpv3-nilrt-linux-gnueabi
(Intel x64-based targets, 2017 software stack) --sysroot=C:\build\17.0\x64\sysroots\core2-64-nilrt-linux
- Navigate to C/C++ General>>Paths and Symbols in the left pane of the Properties window. Go there to the Symbols tab and select Add. Enter a symbol of Name kNIOSLinux , press OK and afterwards Apply.
- Navigate to C/C++ Build>>Settings in the left pane of the Properties window. Under Tool Settings tab, navigate to Cross GCC Compiler >> Miscellaneous. Enable Position Independent Code option and click Apply.
- Navigate to Cross GCC Compiler. In the Command text box, add a space after the existing text and enter -fvisibility=protected to instruct GCC to set the symbol visibility to protected and click Apply.
- Go the Error Parsers tab. Make sure that only the GNU Assembler Error Parser, GNU gmake Error Parser 7.0, and the GNU Linker Error Parser options are enabled. Press Apply and afterwards OK to close the Properties window.
- Right-click your project in the Project Explorer tab and select Build Project. Once complete, a .so file will be generated.