NI Wireless Sensor Network Overview
The NI Wireless Sensor Network (WSN) platform simplifies remote monitoring applications and delivers a complete, customizable monitoring solution. NI WSN hardware reduces installation and maintenance costs while delivering a flexible solution that features industrial ratings and extremely low power consumption.
Each wireless sensor network consists of three main components: nodes, gateways, and software. The spatially distributed, battery-powered measurement nodes interface with sensors to monitor assets or their environment. The acquired data wirelessly transmits to the gateway, which can operate independently or connect to a host system where you can collect, process, analyze, and present your measurement data using the software. Furthermore, you can use the LabVIEW WSN Module to deploy embedded applications to NI WSN measurement nodes to perform local data analysis and control.
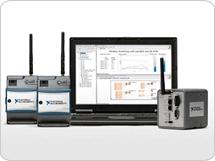
Figure 1. WSN systems can scale from tens to hundreds of nodes and seamlessly integrate with existing wired measurement and control system.
NI CompactRIO Overview
NI CompactRIO is a reconfigurable embedded control and acquisition system that can be used in a variety of embedded control and monitoring applications. The CompactRIO system’s rugged hardware architecture includes I/O modules, a reconfigurable field-programmable gate array (FPGA) chassis, and an embedded controller. The LabVIEW Real-Time Module is used to deploy embedded applications to run on the CompactRIO controller, offering real-time data processing and analysis. The LabVIEW FPGA Module is used to target and program the chassis FPGA, delivering the capability to perform advanced timing and closed-loop control in hardware.
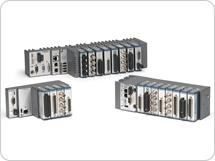
Figure 2. Choose between Value, Ultra-Rugged, and High Performance NI CompactRIO systems to meet the unique needs of your application.
Integrating NI WSN and NI CompactRIO Systems
With the NI 9795 WSN C Series Gateway, you can create complete wired and wireless monitoring and control systems with LabVIEW. The gateway can plug into any slot in your CompactRIO chassis to deliver wireless connectivity to up to 36 deployed WSN nodes. Through the NI RIO Scan Interface (RSI), WSN I/O data is available in your deployed LabVIEW Real-Time application, where you can integrate WSN I/O with the rest of your CompactRIO measurement and control system. Because the data is passed through the scan interface, you must use the NI 9795 in CompactRIO chassis that are compatible with RSI.
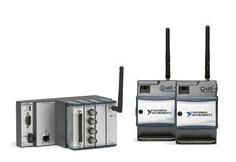
Figure 3. Elegantly combine wired CompactRIO systems with wireless WSN systems using the NI 9795 WSN C Series Gateway
By combining NI CompactRIO and NI WSN systems you can have the best of both worlds: high-speed I/O with tight synchronization, FPGA-based control, and real-time processing with NI CompactRIO and lower-speed remote monitoring of assets or environments far away from your CompactRIO system or in hard to reach places with NI wireless sensor networks.
TUTORIAL: Adding WSN I/O to NI CompactRIO
The following step-by-step guide will help you integrate NI WSN and NI CompactRIO systems.
Required Software
To use NI CompactRIO and NI WSN you will need the following software components:
- NI LabVIEW
- NI LabVIEW Real-Time Module
- NI-RIO Driver Software
- NI-WSN Driver Software (version 1.3 or later)
- NI LabVIEW FPGA Module (optional if you would like to program the CompactRIO FPGA)
- NI LabVIEW Wireless Sensor Network Module (optional if you would like to program WSN measurement nodes)
To begin, make sure you have installed the LabVIEW Development Environment, LabVIEW Modules and device drivers to your host PC.
Required Hardware and Accessories
- NI CompactRIO system (modular or integrated) that supports RIO Scan Interface
- NI 9795 WSN C Series Gateway
- NI WSN-32xx Measurement Nodes
- Power Supply for CompactRIO (NI PS-15 recommended)
- Ethernet Cable
You may use any NI CompactRIO system that supports RIO Scan Interface. For the purposes of this tutorial, we will use the cRIO-9076 four-slot integrated CompactRIO system.
Assembling and Configuring your CompactRIO System
This tutorial will assume that you have already set up and configured your CompactRIO system for first use. If this is not the case, and you need detailed instructions for assembling and configuring your CompactRIO system for first use, refer to this Getting Started tutorial. Complete all of STEP 2 in the Getting Started tutorial by clicking through to the Next Step at the bottom of each page. Complete each of the following sections before proceeding:
- Assemble Your NI CompactRIO System
- Configure Your NI CompactRIO System for First Use
- Configure NI CompactRIO for DHCP (or Configure NI CompactRIO With a Static IP Address)
- Install Software on Your NI CompactRIO Controller
When your CompactRIO system is ready to use (assembled and powered, with software installed), insert the NI 9795 WSN C Series Gateway into any available slot in your CompactRIO chassis.
Add WSN Nodes to your System
In the NI WSN system, the gateway acts as the network coordinator, and it must know which nodes are authorized to join its network. To do this, open Measurement & Automation Explorer (MAX) and locate your CompactRIO system under Remote Systems.
- Expand the entry for your CompactRIO to view the two entries underneath (Devices and Interfaces, Software)
- Expand Devices and Interfaces and select WSN
- In the WSN Nodes tab that appears to the right, select Add Node and enter the necessary information for your first WSN-32xx device. Continue doing so until all of your WSN nodes appear in MAX.
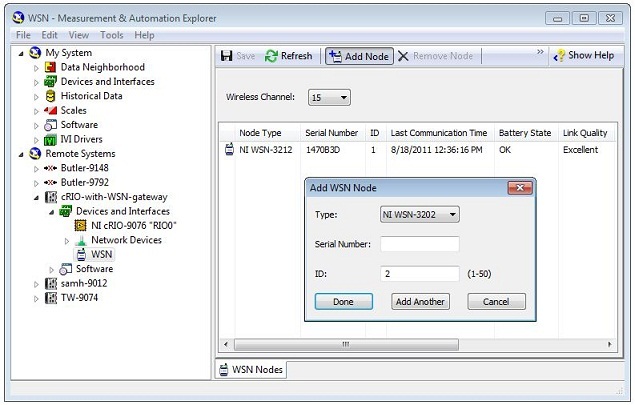
Figure 4. Configuring Your WSN System in Measurement & Automation Explorer
When your WSN nodes power up, they will automatically connect to the gateway and you can click Refresh to see the most recent node parameters in MAX. To force a reconnect on nodes that may have been previously configured for another gateway, press and hold the connect button for five seconds.
Configure Your System in the LabVIEW Project
Once your nodes have been configured in MAX and joined the gateway, open LabVIEW and create an Empty Project.
- Name and Save your Project
- Right-click on the Project name and select New >> Targets and Devices...
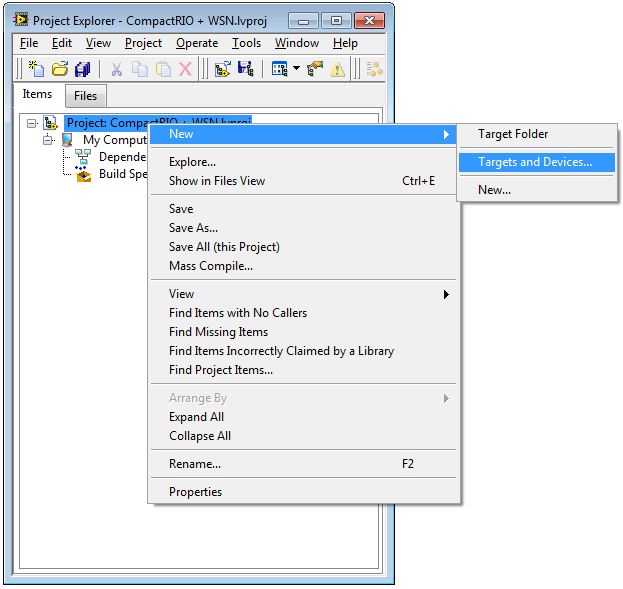
Figure 5. Adding Hardware to and Empty LabVIEW Project
- In the ensuing window, expand Real-Time CompactRIO and select the CompactRIO system which contains your NI 9795 WSN C Series Gateway.
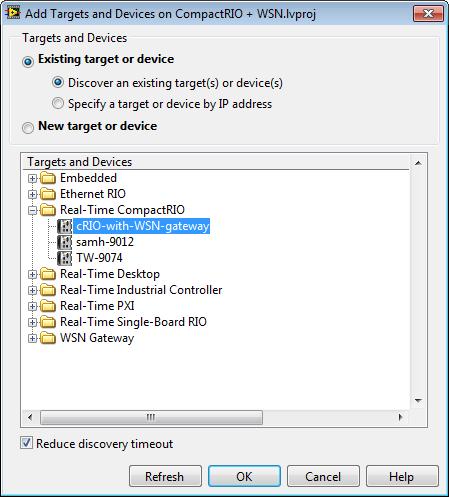
Figure 6. Select the Appropriate CompactRIO System to add to your LabVIEW Project
- If you have LabVIEW FPGA installed on your host PC, you will see an additional dialog box when you add the CompactRIO system to your LabVIEW Project. In this "Select Programming Mode" window, select Scan Interface and then select Continue. Later, if you wish to program the FPGA, you can run your CompactRIO in a hybrid mode which combines the ease of use of the RIO Scan Interface with the advanced functionality of the FPGA Interface. To learn more about running a CompactRIO system in hybrid mode, refer to this knowledgebase article: How To Use Scan Engine and FPGA Simultaneously on a CompactRIO (Hybrid Mode)
- When the CompactRIO system is added to your LabVIEW Project, expand the entries to view the RSI-supported modules underneath the chassis.
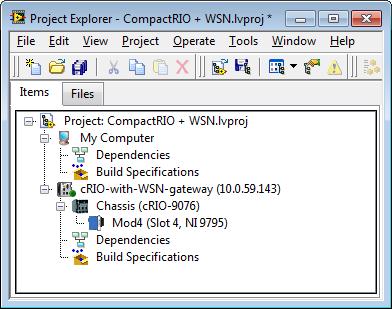
Figure 7. CompactRIO system added to the LabVIEW Project
- Next, add your WSN system to the project by right-clicking the top-level CompactRIO system and selecting New >> Targets and Devices...
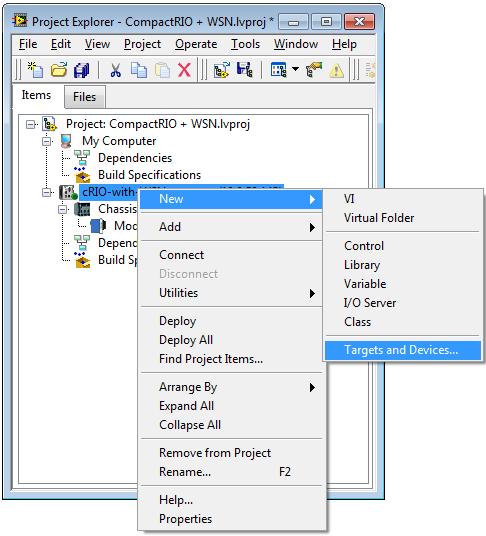
Figure 8. Add the Wireless Sensor Network to Your CompactRIO
- In the ensuing window, expand WSN Node and select all of the nodes that were configured with your gateway in MAX, then select OK.
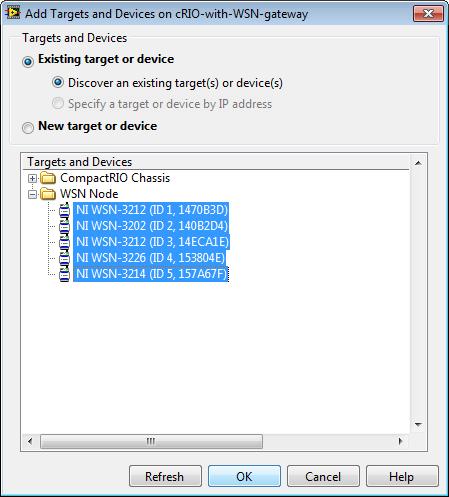
Figure 9. Select Nodes to Add to the LabVIEW Project
- In the LabVIEW Project, you will now see a Wireless Sensor Network entry underneath the CompactRIO system. Expand this entry to view the nodes that are configured to communicate with your NI 9795 gateway. Expand a node to see the channels that you can read from or write to in LabVIEW.
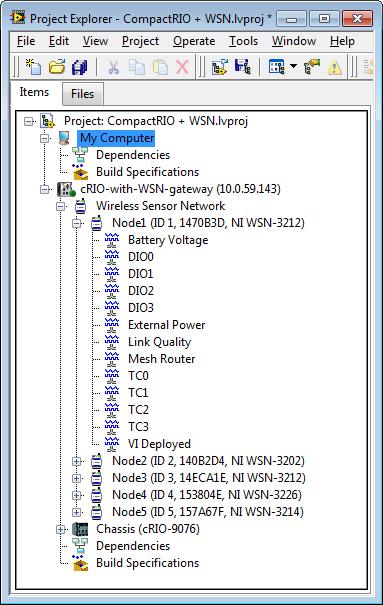
Figure 10. Complete CompactRIO and WSN Configuration in the LabVIEW Project
Configure WSN Node Parameters and I/O Channels
Each WSN node offers four analog input channels and 2 or 4 digital I/O channels. These channels, along with other node properties can be configured from the LabVIEW Project.
Right-click on a node in the LabVIEW Project and select Properties.
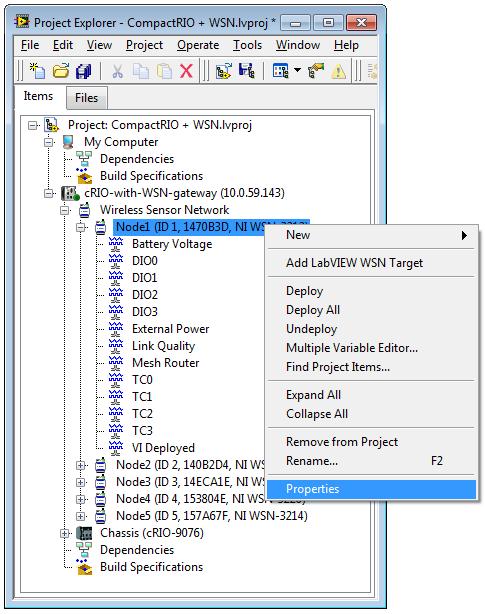
Figure 11. Bring up the Node Properties Window
In the NodeN Properties window, you can configure settings for each analog and digital channel. You can also set the Attribute and Range for each analog input channel, as well as the Drive Mode for each digital I/O channel. In this system, a J-type thermocouple is connected to TC0, and the Range is set to Fahrenheit. Each channel can be configured differently, depending on the unique needs of your application.
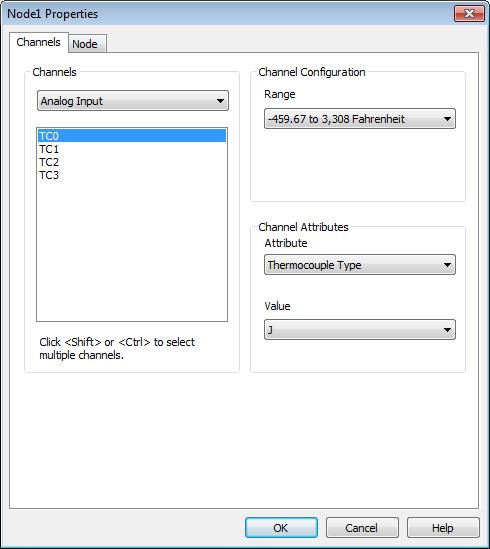
Figure 12. Setting Node I/O Channel Properties
In the Properties window, select the Node tab. Here you can change the node ID, provide an alias, and set the node sample interval. The sample interval designates how many seconds elapse between consecutive data acquisition cycles on the node. In this system, the sample interval is set to 10 seconds. This means that the node will remain in a low-power sleep state for 10 seconds, then wake up, sample all of its channels, transmit all of that data back to the gateway, and then re-enter the low-power sleep state and reset the sample interval timer.
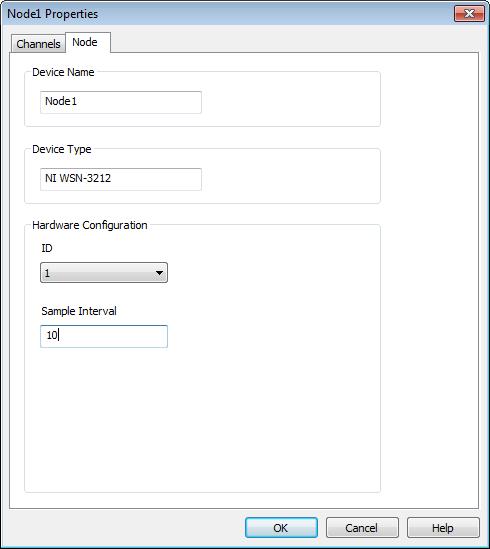
Figure 13. Configuring Node Properties, such as Sample Interval
Configure these properties for each of the nodes in your system, clicking OK when finished in each Properties dialog box.
Reading WSN I/O Data in LabVIEW
Now that hardware is properly configured in the Project window, you are ready to extract WSN measurement data and other node parameters in LabVIEW. WSN data can be viewed on the host PC or integrated into a deployed LabVIEW Real-Time application that runs on the CompactRIO controller.
Monitoring WSN Data from the Host PC
- In the Project window, right-click My Computer and select New >> VI. This opens a new LabVIEW VI that will run on your host machine.
- Drag the WSN I/O variables that you wish to monitor from the LabVIEW Project window to the LabVIEW Block Diagram. In this example, a loop is configured to continually read temperature from the J-type thermocouple that is connected to TC0 (see Figure 14).
- Even if you do not have sensors connected to your node at this time, you can still read node parameters in LabVIEW. Node properties like Link Quality, Battery Voltage, and whether or not a node is configured as a mesh router are exposed variables that you can monitor at any time. In this example, we are monitoring temperature in addition to several node properties.
- Wire controls and indicators to your VI, configure the Front Panel, and run the VI to instantly acquire data from your WSN system.
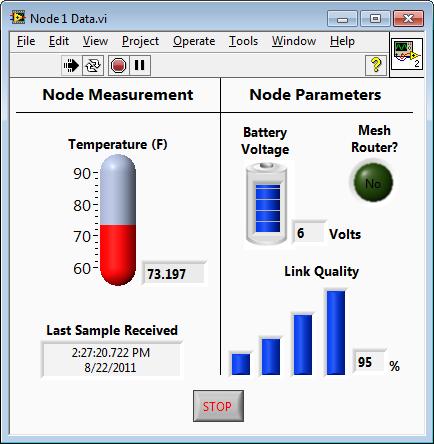
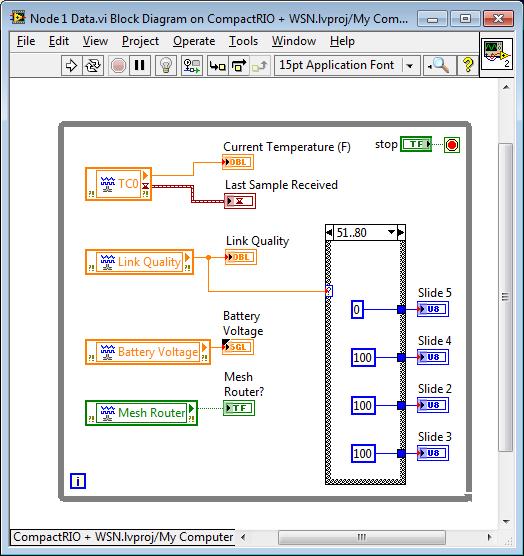
Figure 14. LabVIEW VI to monitor WSN data and parameters
When you run the VI, the I/O variables are deployed to the gateway. I/O variable data is passed through RIO Scan Interface to the CompactRIO controller, and then over Ethernet to the host PC. But, you can embed the WSN I/O variables into a deployed LabVIEW Real-Time application running on the CompactRIO.
Monitoring WSN Data Within a Deployed LabVIEW Real-Time Application
- Back in the LabVIEW Project window, right-click the top-level entry for the CompactRIO system and select New >> VI. This will add a LabVIEW Real-Time VI to your CompactRIO controller that can read WSN data in addition to data from other modules in your chassis. This VI can run independently of the host VI and perform high-speed data acquisition or closed-loop control.
- The procedure for adding WSN I/O data to this LabVIEW Real-Time VI is the same as adding WSN I/O data to a host VI, as outlined above. Just drag-and-drop the variables that you wish to monitor from the LabVIEW Project window to the LabVIEW Block Diagram.
- Wire controls and indicators to your VI, configure the Front Panel and run the VI to instantly acquire data from your WSN system.
- When you run this VI, I/O variables and the VI are deployed to the CompactRIO controller, where the code is executed from within the Real-Time operating system. If you would like to deploy this VI as an RT Startup Application, refer to this KnowledgeBase article: Deploying a LabVIEW Real-Time Startup Executable Without the LabVIEW Development Environment