Setup Using Wireless Infrastructure (Client Mode)
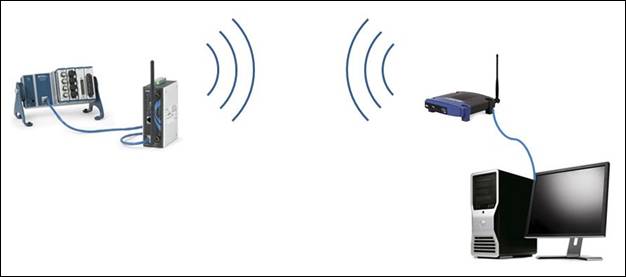
Figure 2. With your PC hardwired into your wireless infrastructure, follow the steps below to connect wirelessly to your Ethernet DAQ device.
Use the following steps to configure your system when your PC is hardwired to a wireless router or other infrastructure.
Configure the NI CompactDAQ chassis network settings.
-
Plug one end of your Ethernet cable into the NI CompactDAQ chassis and the other end into your computer’s Ethernet port.
-
Open Measurement & Automation Explorer (MAX).
-
Expand Devices and Interfaces to confirm that your device is detected. If the chassis is not listed under Devices and Interfaces » Network Devices, right-click the chassis and select Add Device. If the device is not listed, right-click Network Devices, and select Find Network NI-DAQmx Devices.
-
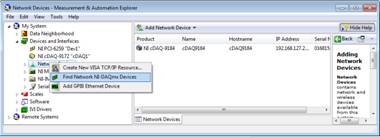
Figure 3. Right-click Network Devices to manually find your Ethernet NI CompactDAQ chassis.
In the Add Device Manually field, type the host name or IP address of the Network DAQ device, click the + button, and click Add Selected Devices. The default IP Address for the NI cDAQ-9184 chassis is 192.168.0.2. The default host name is NI cDAQ-9184. Enter one of these two values, and your device will then be added under Devices and Interfaces » Network Devices. If you cannot see your device still, ensure that your network card is configured to obtain an IP address automatically. Next click Refresh List on the Find Network and NI DAQmx Devices pop-up.
-
Right-click the cDAQ-9184 chassis in MAX and select Reserve Chassis.
-
Click on the cDAQ-9184 chassis and navigate to the Network Settings tab on the bottom of the MAX window.
-
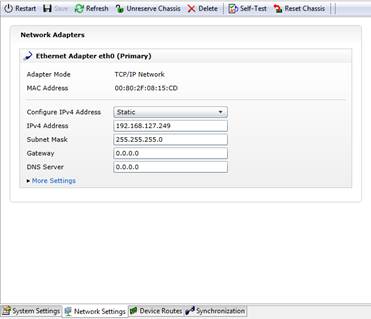
Figure 4. Use the Network Settings tab to configure the NI CompactDAQ chassis to use a static IP address.
-
On the Configure IPv4 Address pull-down tab, select Static. Change the IPv4 Address to 192.168.127.xxx where xxx is a number less than 255 and not 253 (253 is the default IP Address of the Moxa AWK-3121 wireless device. Change the subnet mask to 255.255.255.0. Click the save option at the top of the MAX window. This configures your NI CompactDAQ chassis to communicate with the Moxa AWK-3121 wireless device. However, you will not be able to access the device from your computer until after configuring the PC network settings.
Configure the router network settings.
-
Remove the Ethernet cable from your NI cDAQ-9184 chassis and plug it into the LAN port of your wireless router. This setup uses a D-Link wireless router, but any wireless router with the capability to maintain a static IP address should be acceptable.
-
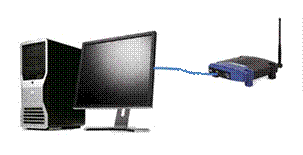
Figure 5. Connect your router to the Ethernet port of your PC. Note, connect to the LAN ports of the router, not the WAN port.
-
In your browser, enter the Default IP Address number. This should be listed on the bottom of your wireless router. If not, search “<Manufacturer’s Name> Default IP Address” on Google or any other search engine, where <Manufacturer’s Name> is the name of the router manufacturer. For D-Link, this number is 192.168.0.1 and the login is Admin with no password.
-
Log in to the router using the default user name and password.
-
Navigate to the router’s Network Settings, which is where the Router IP Address is defined. You should see a category within those setting similar to Router Settings. In Router Settings, you can change the router IP Address to communicate with the Moxa AWK-3121 wireless device.
In the Router IP Address box, enter a new IP Address. For the Moxa device, valid IP Addresses will look like 192.168.127.xxx where xxx is a number less than 255 and not 253 or the value assigned to the NI CompactDAQ chassis. Change the subnet mask to 255.255.255.0. An image of how this should look when using a D-Link wireless router is highlighted in Figure 6.
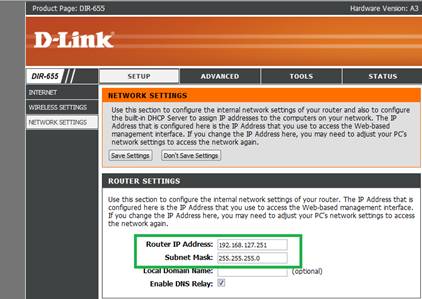
Figure 6. All the devices on the subnet can communicate with each other.
-
When this has been completed, Save the router settings and Reboot the router. Once this is done, it will not be able to communicate with the computer until the next step.
Configure the PC network settings.
At this point, all of your devices are configured so that they can communicate with each other. The only thing left to do is to configure your computer’s IP Address so that it can close the communication circuit.
-
Navigate to your Control Panel. Click on Network and Sharing Center. In the Network and Sharing Center, select Change Adapter Settings option, like in Figure 7.
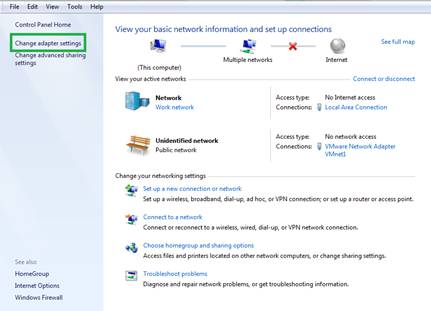
Figure 7. Select Change Adapter Settings to change your PC IP Address.
-
Right-click the Local Area Connection network and select Properties.
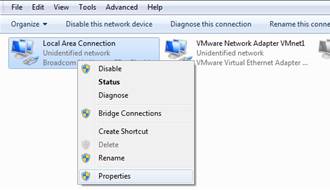
Figure 8. Right-click on the Local Area Connection to access the IPv4 settings.
-
Double-click on Internet Protocol Version 4 (TCP/IPv4) option and its property box should pop up.

Figure 9. In the IPv4 Properties, you can change the computer’s IP Address and the subnet mask.
-
Select Use the following IP Address and change the IP Address to 192.168.127.xxx where xxx is a number below 255 but not a number previously used or 253 and click OK.
-
Click OK on the Local Area Connection Properties pop-up to enable the new IP Address.
Configure the Moxa AWK -3121 settings
Once the previous steps have been completed, you are ready to begin setting up the Moxa device and your computer through the wireless router.
-
Wire the Moxa device’s Ethernet port to the PC with an Ethernet cable. You can use the cable from the wireless router, but ensure that you do not remove the power to the router.
-
Go to your web browser and type in 192.168.127.253. This should bring up the Moxa AWK-3121 web server page.
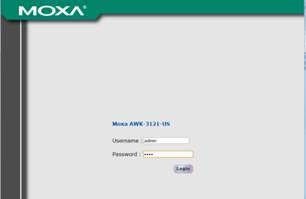
Figure 10. Log in to the MOXA device just like the router in the previous steps.
-
On the server page, leave the username as admin, and type in the default password, which is root. Click Login.
-
From the menu on the left side of the page under the Main Menu, expand Wireless Settings and click on Operation Mode. On this page, ensure that Wireless enable is Enabled, and change the Operation Mode to the Client option. Then click Submit.
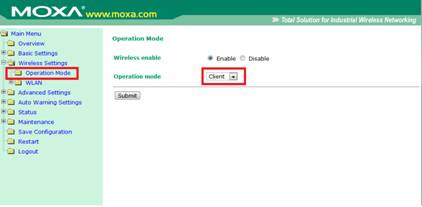
Figure 11. Change the Moxa AWK-3121 Operation Mode to Client.
-
Expand the WLAN folder in the Main Menu under Wireless Settings. Click on the folder titled Basic Wireless Settings. Ensure that the RF type is B/G Mixed and the Channel is 6. Under SSID, click the Site Survey button.
-
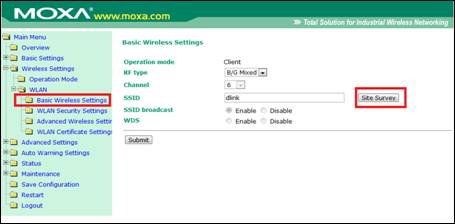
Figure 12. Select Site Survey to find your wireless network.
-
This should bring up a new window and you should see your wireless router. Click on your wireless router’s name in the window. This then prompts a new pop-up window asking “Are you sure you want to change the SSID to ’device‘?” Click OK. This brings you back to the Basic Wireless Settings. Click Submit. Once this has taken effect in the next few steps, it will allow you to communicate with the wireless router connected to your computer.
-
After you have completed the previous steps, you must save the configuration. To do this, click the Save Configuration option under the Main Menu along the left side of the Moxa configuration page. Click Save to save your changes into the memory of the Moxa AWK-3121.
-
A flashing warning in the top-right corner of your window tells you that it is necessary to restart your device. Click on the Restart folder in the Main Menu and click the Restart button in that folder. Your device takes approximately 30 seconds to restart, and should beep around 10 seconds. After it has restarted, you should be ready to begin collecting data with your system.
Ensure that you can send and receive data from your NI CompactDAQ chassis
All of your equipment is now ready to be put together. To do this, you must connect your wireless router to your computer’s Ethernet port, and connect your NI CompactDAQ chassis to the Ethernet port of your Moxa AWK-3121.
-
Open MAX and make sure that you can see the device. Your page should look something like Figure 13.
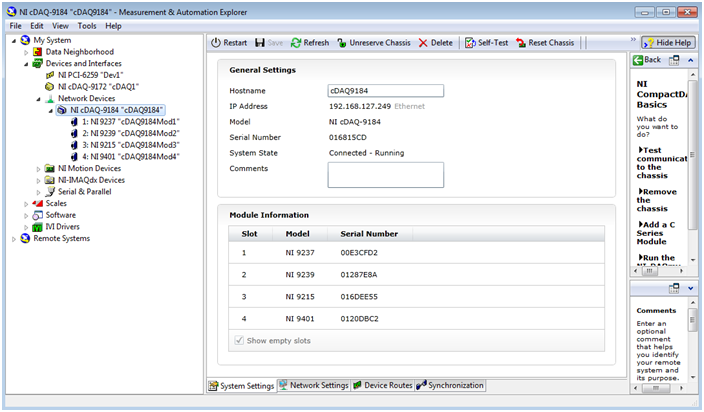
Figure 13. You should see your device within MAX, just like if it were hardwired to the PC
-
Make sure that you still have the chassis reserved. If you do not, click Reserve Chassis.
-
Run a self-test by clicking the Self-Test button along the top toolbar. If the device passes the self-test, you can now begin data collection.
-
Expand the pull-down menu for your NI CompactDAQ chassis. Now, it is possible to open a test panel for any of the modules in the chassis.
-
Run a Test Panel by clicking on a module in your chassis and selecting Test Panels from the top toolbar.
-
Configure the data acquisition settings and press Start.
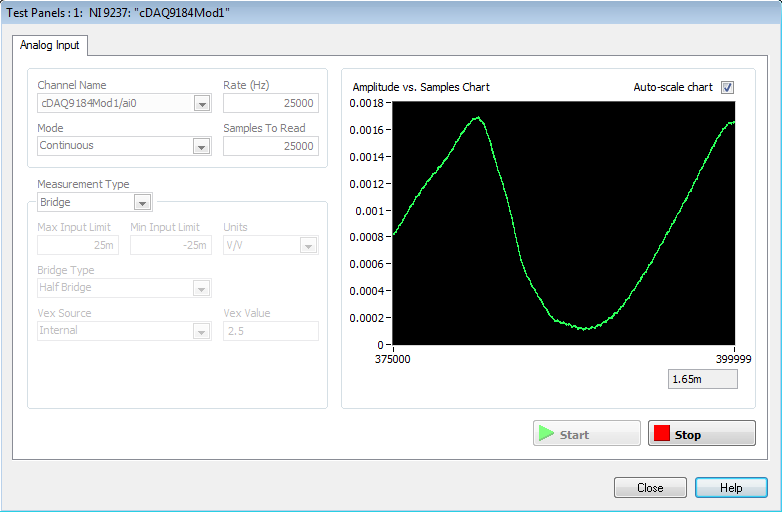
Figure 14. The test panel should behave just like your chassis is hardwired to the PC
After this has been completed and data has been streamed successfully, you are ready to begin programming your device.
Setup Using a Built-In Wireless Card (Access Point Mode)
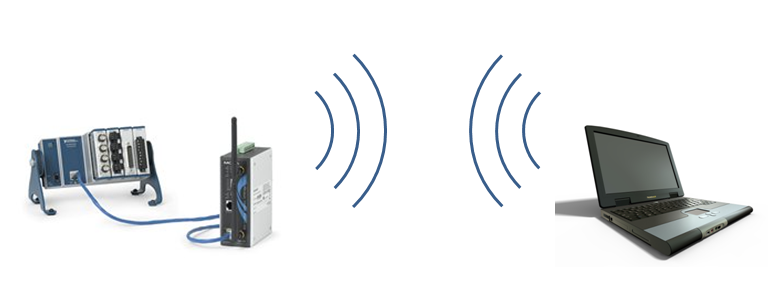
Figure 15. If your PC has a built-in wireless card, you can connect to the MOXA AWK-3121 in access point mode.
Use the following steps to configure your system when your PC includes a wireless card.
Configure the NI CompactDAQ chassis network settings
-
Plug one end of your Ethernet cable into the NI CompactDAQ chassis and the other end into your computer’s Ethernet port.
-
Open MAX.
-
Expand Devices and Interfaces to confirm that your device is detected. If the chassis is not listed under Devices and Interfaces » Network Devices, right-click the chassis and select Add Device. If the device is not listed, right-click Network Devices, and select Find Network NI-DAQmx Devices.
-

Figure 16. Right-click on Network Devices to manually add your NI CompactDAQ chassis.
In the Add Device Manually field, type the host name or IP address of the Network DAQ device, click the + button, and click Add Selected Devices. The default IP Address for the NI cDAQ-9184 chassis is 192.168.0.2. The default host name is NI cDAQ-9184. Enter one of these two values, and your device will then be added under Devices and Interfaces » Network Devices. If you cannot see your device still, ensure that your network card is configured to obtain an IP address automatically. Next click Refresh List on the Find Network and NI DAQmx Devices pop-up.
-
Right-click the cDAQ-9184 chassis in MAX and select Reserve Chassis.
-
Click on the cDAQ-9184 chassis and navigate to the Network Settings tab on the bottom of the MAX window.
-
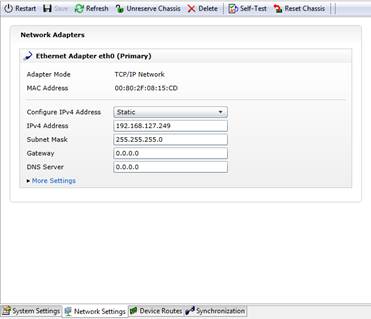
Figure 17. Use the Network Settings tab to configure the NI CompactDAQ chassis to use a static IP address.
-
On the Configure IPv4 Address pull-down tab, select Static. Change the IPv4 Address to 192.168.127.xxx where xxx is a number less than 255 and not 253 (253 is the default IP Address of the Moxa AWK-3121 wireless device. Change the subnet mask to 255.255.255.0. Click the save option at the top of the MAX window. This configures your NI CompactDAQ chassis to communicate with the Moxa AWK-3121 wireless device. However, you will not be able to access the device from your computer until after configuring the PC network settings.
Configure the PC network settings.
At this point, all of your devices are configured so that they can communicate with each other. The only thing left to do is to configure your computer’s IP Address so that it can close the communication circuit.
-
Navigate to your Control Panel. Click on Network and Sharing Center. In the Network and Sharing Center, select Change Adapter Settings option, like in Figure 7.
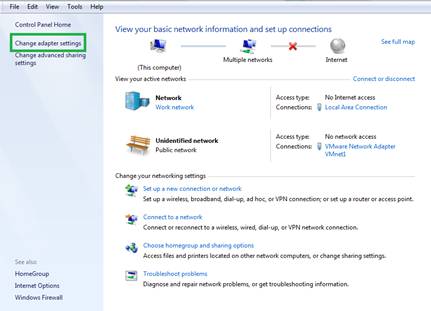
Figure 18. Select Change Adapter Settings to change your PC IP Address.
-
Right-click the Local Area Connection network and select Properties.
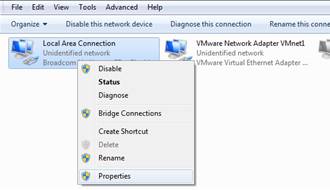
Figure 19. Right-click on the Local Area Connection to access the IPv4 settings.
-
Double-click on Internet Protocol Version 4 (TCP/IPv4) option and its property box should pop up.
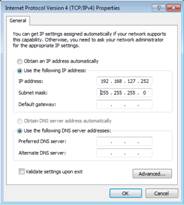
Figure 20. In the IPv4 Properties, you can change the computer’s IP Address and the subnet mask.
-
Select Use the following IP Address and change the IP Address to 192.168.127.xxx where xxx is a number below 255 but not a number previously used or 253 and click OK.
-
Click OK on the Local Area Connection Properties pop-up to enable the new IP Address.
Configure the Moxa AWK-3121 settings
After you complete the previous steps, you are finally ready to begin setting up the Moxa device and your computer through the wireless router. Before the final product is complete, however, it is necessary to configure the Moxa AWK-3121.
-
Wire the Moxa’s Ethernet port to the PC with an Ethernet cable. You can use the cable from the wireless router, but ensure that you do not remove the power to the router.
-
Go to your web browser and type in 192.168.127.253. This should bring up the Moxa AWK-3121 web server page.
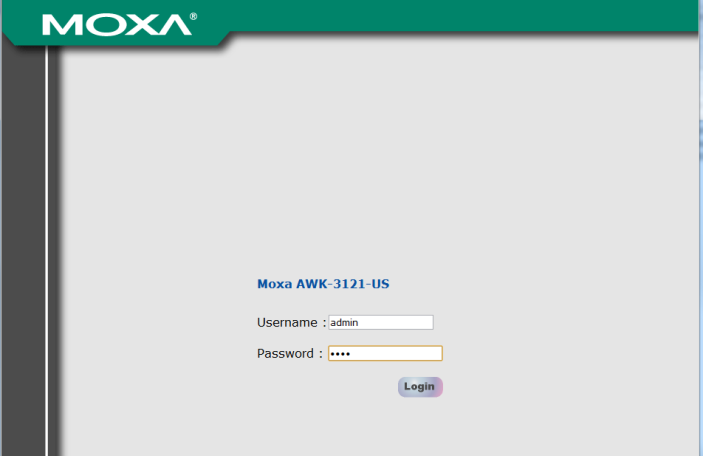
Figure 21. Log in to the MOXA device just like the router in the previous steps.
-
On the server page, leave the username as admin, and type in the default password, which is root. Click Login.
-
From the menu on the left side of the page under the Main Menu, expand Wireless Settings and click on Operation Mode. On this page, ensure that Wireless enable is Enabled, and change the Operation Mode to the AP (Access Point) option. Once this is done, click Submit.
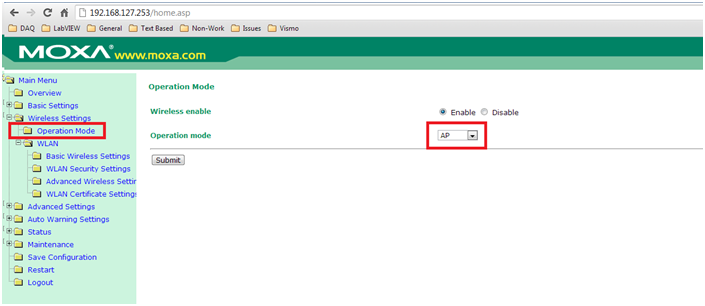
Figure 22. Change the Moxa Operation Mode to AP, short for access point.
-
Expand the WLAN folder in the Main Menu under Wireless Settings. Click on the folder titled Basic Wireless Settings. Ensure that the RF type is B/G Mixed and the Channel is 6. When this is completed, click Submit. Once this has taken effect in the next few steps, you can directly use the Moxa AWK-3121 as an access point.
-
After the previous steps have been completed, it is necessary for you to save the configuration. You can do this by clicking the Save Configuration option under the Main Menu along the left side of the Moxa configuration page. Click Save to save your changes into the memory of the AWK-3121.
-
A flashing warning in the top-right corner of your window tells you that it is necessary to restart your device. Click on the Restart folder in the Main Menu and click the Restart button in that folder. Your device takes approximately 30 seconds to restart, and should beep around 10 seconds. After it has restarted, you should be ready to begin collecting data with your system.
Ensure that you can send and receive data from your NI CompactDAQ chassis
All of your equipment is now ready to be put together. To do this, you must connect your wireless router to your computer’s Ethernet port, and connect your NI CompactDAQ chassis to the Ethernet port of your Moxa AWK-3121.
-
Open MAX and make sure that you can see the device. Your page should look something like Figure 13.
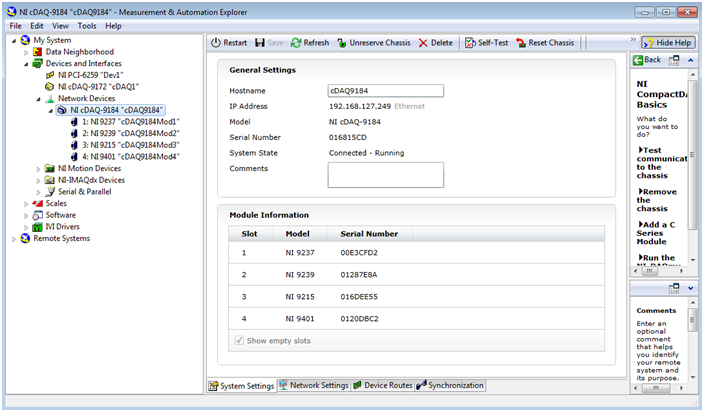
Figure 23. You should see your device within MAX, just like if it were hardwired to the PC
-
Make sure that you still have the chassis reserved. If you do not, click Reserve Chassis.
-
Run a self-test by clicking the Self-Test button along the top toolbar. If the device passes the self-test, you can now begin data collection.
-
Expand the pull-down menu for your NI CompactDAQ chassis. Now, it is possible to open a test panel for any of the modules in the chassis.
-
Run a Test Panel by clicking on a module in your chassis and selecting Test Panels from the top toolbar.
-
Configure the data acquisition settings and press Start.
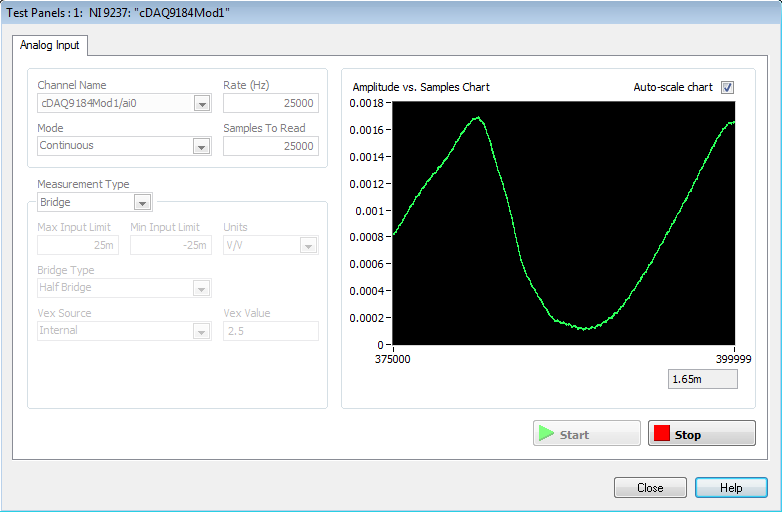
Figure 24. The test panel should behave just like your chassis is hardwired to the PC
After this has been completed and data has been streamed successfully, you are ready to begin programming your device.
Summary
The bandwidth and cost of IEEE 802.11 enables high-speed, reliable measurement systems where wired systems were previously the only solution. As your measurement systems need to reach beyond wires, use NI CompactDAQ systems paired with the NI-tested Moxa AWK-3121 to ensure your data is secure and reliable.