Solution
To add the missing glyphs, you will need to automatically or manually synchronize with the NI Icon Library.
Note: Before continuing to the below steps, make sure that the folder
C:\Users\<User>\Documents\LabVIEW Data\Glyphs exists.
Automatically Synchronize With the NI Icon Library
Follow these steps to automatically synchronize with the NI Icon Library.
- Open the Icon Editor Dialog Box by first opening up a LabVIEW VI. Select File » VI Properties (or File » Control Properties) to display the VI Properties dialog box (or Control Properties dialog box). Then select General from the Category pull-down menu and click the Edit Icon button.
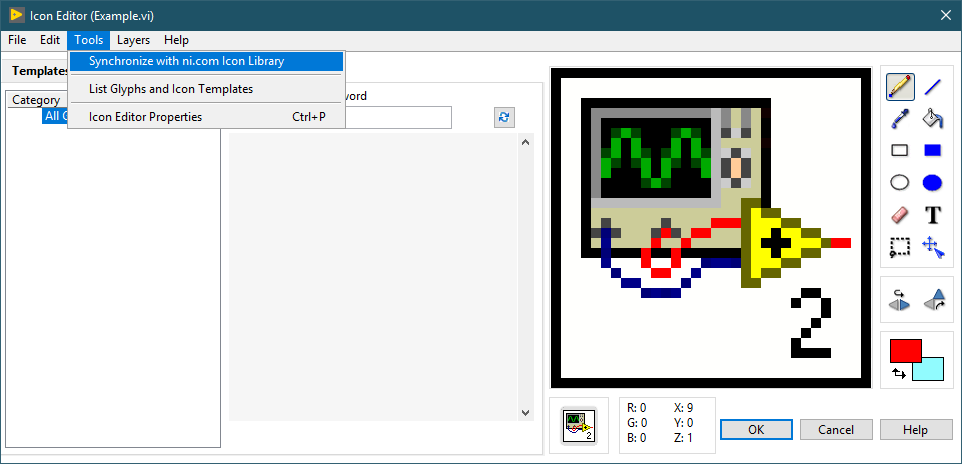
- Within the Icon Editor, go to Tools » Synchronize with ni.com Icon Library. If you have access to the NI Web server, this will start downloading the Icon Library automatically to LabVIEW. This step is also shown in the image below:

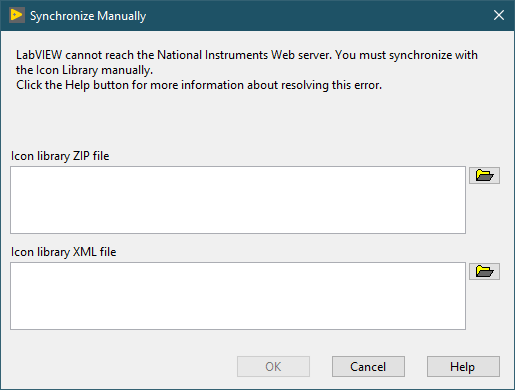
- If LabVIEW cannot reach the NI Web server, you'll see the Synchronize Manually window to start the manual synchronization. Refer to the next section for more steps.
Manually Synchronize With the NI Icon Library:
If LabVIEW displays the below error, this means LabVIEW cannot reach the NI Web server and you should synchronize manually.
LabVIEW cannot reach the National Instruments Web server. You must synchronize with the Icon Library Manually. Click the Help button for more information about resolving this error.
Follow these steps to synchronize manually to the Icon Library.
- Download the Icon_Library.zip file and save it to an easily accessible location.
- Save the Icon Library XML file (right-click link, save file as) to an easily accessible location. The Icon Library XML file determines the structure of the files in the Icon_Library.zip file.
- In the Synchronize Manually dialog box, enter the path to the Icon_Library.zip file in the Icon library ZIP file field.
- Enter the path to the Icons_filtered.xml file in the Icon library XML file field.
- Click the OK button. LabVIEW populates the Synchronize with Icon Library dialog box with all icons from the .zip file and with a structure that the XML file defines.
If you are running LabVIEW on a virtual machine, sometimes LabVIEW will install the glyph and template folder on a network drive. To fix this, follow the steps below:
- Make sure that the C:\Users\<user>\Documents\LabVIEW Data\Glyphs and C:\Users\<user>\Documents\LabVIEW Data\Icon Templates folders exist. Create them otherwise.
- Start LabVIEW and navigate to Tools » Options » Paths and set the default data directory to C:\Users\<user>\Documents\LabVIEW Data
- Save and close LabVIEW.
- On startup, LabVIEW should find the icons and glyphs folder.