Solution
Since there is no continuous connection between the computer and the cRIOs and sbRIOs and since they do not have network connection, we cannot use the usual synchronization technologies such as SNTP and IEEE 1588. However, we can set the clock on each RIO system to the clock on the PC during the configuration stage when the cRIO or sbRIO is connected to the computer. You can write a VI that does the following steps:
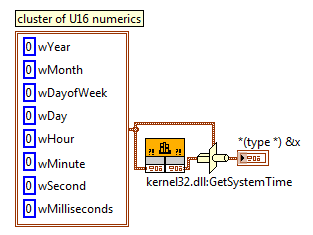
- Pull the time from the Windows OS:
- Place a Call Library Function Node on the block diagram.
- Double-click the node to open the Call Library Function dialog box.
- Click the Browse button and select the kernel32.dll (usually found at C:\WINDOWS\system32\kernel32.dll).
- Select GetSystemTime from the Function Name drop-down list.
- Select stdcall (WINAPI) from the Calling Conventions drop-down list.
- Under the Parameters tab, for return type select Numeric and select Signed 8-bit Integer.
- Click Add a Parameter After and for Type select Adapt to Type and for Data Format select Handles by Value.
- Click the OK button to configure the Call Library Function Node.
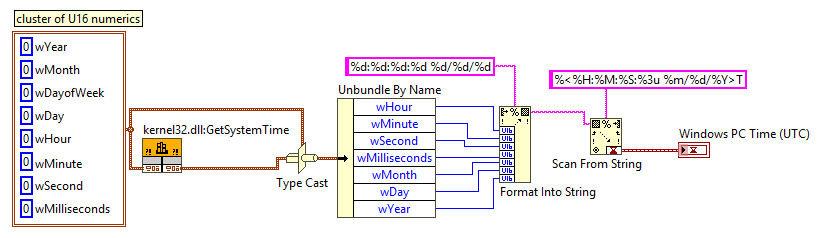
- This function returns a structure of eight WORDS (16-bit unsigned integers). To replicate this in LabVIEW, create a cluster of eight WORDS (U16 numerics). The eight WORDS represent the Year, Month, Day of Week, Day of Month, Hour, Minute, Second, and Millisecond. Wire the cluster to the input of the Call Library Function Node.
- Type Cast the output of the function node to the same cluster created in the previous step.
- The output of the Type Cast will contain all the system time information.
- Format the Windows System time into a LabVIEW TimeStamp format:
- Unbundle By Name the output of the TypeCast
- Build the TimeStamp string using Format Into String node and the format string argument of %d:%d:%d.%d %d/%d/%d.
- Use the Scan From String node and the format string argument of %<%H:%M:%S:%3u %m/%d/%Y>T or the one specific for the format you want to make the string into a TimeStamp datatype.
- Open Up a session with the RT Target that you want to set the time for and use the Set Time.vi (Real-Time >> RT Utilities >> System Configuration >> Utilities >> Set Time.vi) to set the system time on that RT Controller. You will take the TimeStamp created from the previous step to feed into the Set Time.vi.
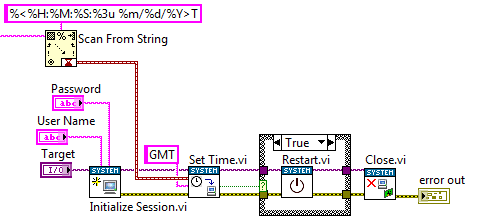
When you run the VI that does the three steps described above, the RT controller will be set to the time of your Windows Computer. Note that the time pulled from your Windows Computer is in UTC/GMT time.
Attached is a VI that will pull the time from you Windows (64-bit) PC and set the time on the Real-Time Target of your choosing.