For a .NET application that uses Measurement Studio libraries to run properly on a target machine, the target machine must contain those Measurement Studio libraries. Along with assemblies and libraries, Measurement Studio ships a set of redistributable merge modules to be merged into an installation package using a merge tool.
If you do not have access to the Measurement Studio Installer Builder, National Instruments recommends creating your installer with the
Windows Installer XML (WiX) toolset. The WiX toolset is a set of open source tools for building Windows installation packages, and it integrates into Visual Studio. Measurement Studio 2013 ships with an example, created using WiX, that you can modify to create an installer for your application.
Note: If you are using Measurement Studio with Visual Studio 2010 or earlier, see
How to Perform Common Tasks in Installer Builder for instructions on deploying your application.
Complete the following steps to build an installation package in Visual Studio 2012 or later:
- Install the latest version of WiX from http://wixtoolset.org/
- Download the example WiX project from NI Community: Updated WiX Installer Example for Measurement Studio Applications and save it to a safe location. This example project is an extension of the example shipped with Measurement Studio that includes WiX code for distributing NI driver merge modules.
- Open All Libraries.2012 .sln from the downloaded project directory.
- Replace the example project in the solution with the project you want to deploy:
- In the Solution Explorer, right-click the ExampleApplication project and select Remove to remove the example project.
- In the Solution Explorer, right-click Solution 'All Libraries.2012' and select Add»Existing Project.
- Using the file browser, navigate to the project you want to deploy and click Add to add it to the solution.
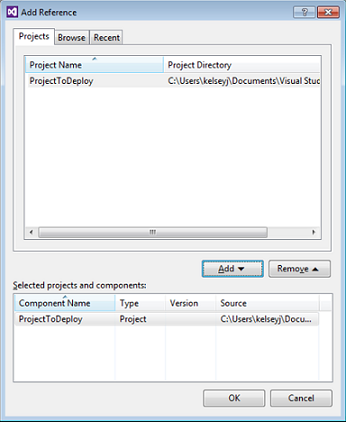
- Add your project to the References in the Setup project:
- Right-click References in the Solution Explorer under the Setup Project and select Add Reference.
- In the Projects tab, select your project. Click Add and then click OK.
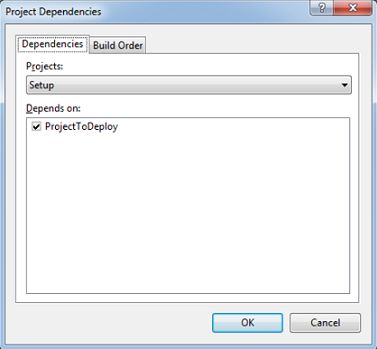
- Add your project as a dependency of the Setup project. This ensures build order.
- Right-click Setup and select Project Dependencies.
- Select Setup from the Projects drop down.
- Check the box next to the name of the project you are deploying.
- Open Product.wxs from the Setup project. Most items you will need to change are marked TODO: in the comments.
Tip: Enable line numbers from the
Tools»Options menu in Visual Studio. See
How to: Display Line Numbers in the Editor.
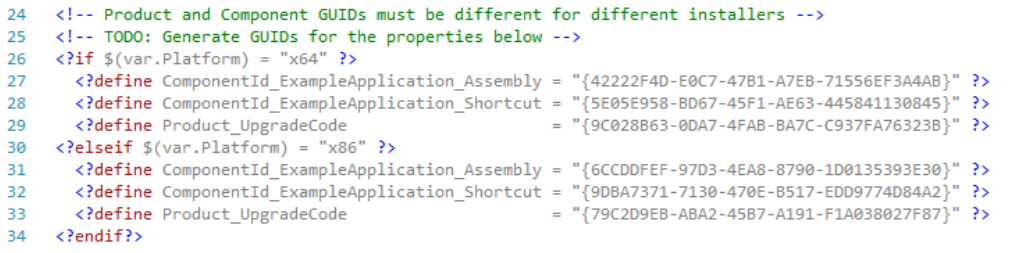
- Near line 18 is the comment:
TODO: Replace the values for the following properties with your own.
These lines define variables that represent basic information about the application you are deploying, such as the application name. In particular, Company_Name and Application_Name determine the names of the directories into which the application installs. For example, if you do not change the defaults, the application directory will be similar to C:\Program Files\Example Company Name\Example Application Name\ .
- Near line 26 is the comment:
TODO: Generate GUIDs for the properties below.
A GUID is a Globally Unique Identifier, which is used by Windows to identify components of installed applications. You will need to generate GUIDs for the six components listed where the text reads Your GUID here.
- Navigate to Tools»Create GUID to launch the Create GUID tool.
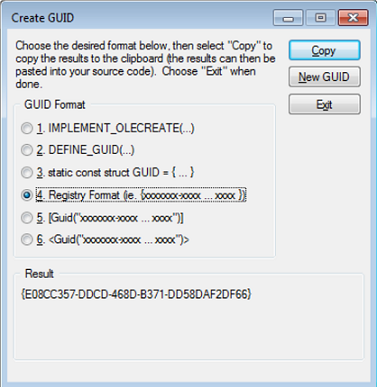
- Select Registry Format.
- Click New GUID. The alphanumeric code under Result in the Create GUID window should change to a new number.
- Click Copy to copy the GUID to the clipboard.
- In the editor, right-click and select Paste or press <Ctrl-V> to paste the new GUID in place of the text Your GUID here.
- Repeat steps 8.a. through 8.e. for each of the six entries that read Your GUID Here. When you are done, the code should look similar to the following screenshot, but with different GUIDs.
- Near line 96, change the Name and Source properties of the File element to: $(var.ProjectToDeploy.TargetFileName) and $(var.ProjectToDeploy.TargetPath) respectively, where ProjectToDeploy is the name of the project that you have added to the solution for deployment.
- Near line 103, change the Name property of the Shortcut element to the name of your application. This text is what will appear as the name of your application in the Windows Start Menu.
- Near line 115 is the comment:
TODO: Uncomment feature groups that represent the dependencies of the application you are installing.
The
Feature element contains references to different feature groups which your project may or may not use. These lines ensure that the correct merge modules for each set of components are included in the installer. Uncomment the
FeatureGroupRef elements which include components required by the project you are deploying, with the following considerations:
- Leave MStudioCommon45_MergeModules uncommented, as it contains merge modules that are required by all of the other Measurement Studio components.
- If your application has a user interface with Measurement Studio controls, uncomment the line with UIShared45_MergeModules. Also uncomment one of the three feature groups UIWinForms45_MergeModules, WPF45_MergeModules, or UIWebForms45_MergeModules, depending on whether your user interface is based on Windows Forms, WPF, or Web Forms.
- You can check which additional feature groups are required by your project by expanding References under your project in the Solution Explorer. For example, if your project references NationalInstruments .Tdms, you should uncomment <FeatureGroupRef Id="Tdms45_MergeModules"/> .
Tip: To uncomment code in XML, remove <!-- and --> from the line of code. You can also use the keyboard shortcut gesture, <Ctrl-K>, <Ctrl-U>, to uncomment a line in Visual Studio and <Ctrl-K>, <Ctrl-C> to comment-out a line.
- Save and close Product.wxs .
- Under the Setup project in the Solution Explorer, expand the Lang folder and open the file en-us.wxl .
- Replace the contents of the String elements, Product_Name and Product_Description, with the name of your product and a product description. These strings appear in the Setup Wizard that runs when you install the application and in the Properties of the .msi installer file.
- Right-click the Setup project and navigate to Properties. On the Tool Settings tab, make sure Suppress ICE validation is checked. The National Instruments merge modules will cause build errors and warnings if Internal Consistency Evaluator (ICE) errors are not suppressed.
- Right-click the Setup project in the Solution Explorer and select Build. This will build both projects and create the installer.
- Copy Setup .msi to the target computer and run it to install your application. If your project is configured in Debug mode, building the installer will also generate a .wixpdb file. If you need to debug your application on the target machine, you will also need to copy Setup.wixpdb to the target machine.
Note: This example only supports projects that target the .NET Framework 4.5. In addition to installing your application from the .msi created by this project, you will need to have the
.NET Framework 4.5 installed on the target computer.
Note: This project deploys assemblies to the
Global Assembly Cache (GAC) on the target computer.
If your application uses any National Instruments hardware drivers, such as NI-DAQmx, NI-VISA, or NI-488.2, then you will also need to install the driver itself on the target machine. For some drivers, there is a run-time engine you can install if you do not want to install the full driver. For example, you can download the NI-DAQmx Runtime from
this location ; select and download the version that matches the driver version installed on your development machine.