To use the cold junction compensation (CJC) on DAQ hardware without the built in CJC apply one of the following options:
Option A: Use the NI MAX to configure the CJC
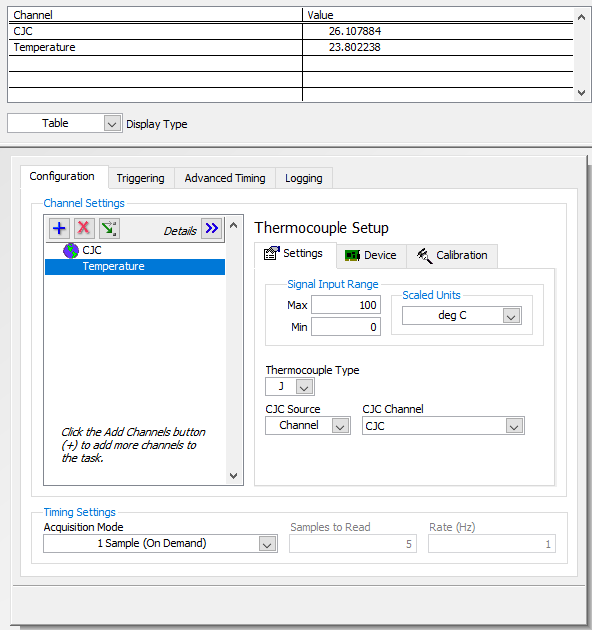
- Open NI MAX, and create a task for your DAQ device(s).
- Add all channels that you wish to read from to this task, including the one that has the sensor that will provide the CJC.
- Right click on the channel that will serve as CJC source and click on Change to Global.
- Under CJC Source, choose Channel.
- Open the CJC Channel drop-down and pick the channel that you would like to use as the CJC source..
- Run the task.
 Option B:Use LabVIEW to configure the CJC:
- Open the block diagram of your LabVIEW VI
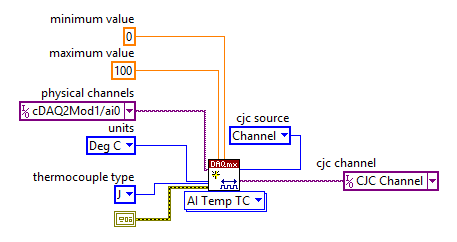
- Add a DAQmx Create Virtual Channel VI to your code and choose the option Analog Input->Temperature->Thermocouple
- Configure the VI:
- Configure your settings.
- Choose the CJC source "Channel"
- Right click on the CJC channel input and chose create constant. Open the dropdown-menu and click on Browse and then on Create New->Max Channel
- Configure this channel through clicking on Acquire Signals->Analog Input->Temperature and choose your kind of temperature sensor. Choose then the physical channel to which this sensor is connected to and enter a name for the Global Virtual NI DAQmx Channel. Then click Finish and configure fewer settings for your sensor like the unit. After confirm with OK you can choose this channel as CJC channel for your thermocouple.
Additional Information
For your measurement you are using a second temperature sensor to define the temperature you need for cold junction compensation of your thermocouple.
If you are interested in this acquired data you may think about to save them as well and add a second Create Virtual Channel VI to your code. If you try this you will get the
Error -200072 in My NI DAQmx Task.