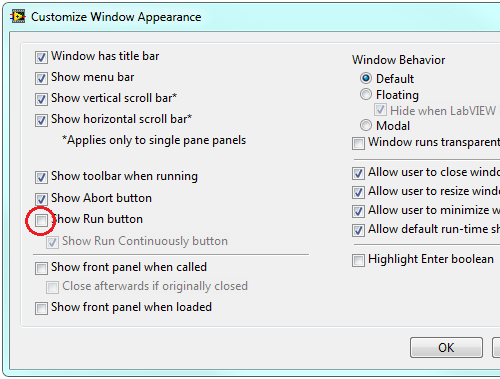
Yes, it is possible to remove the run button or the abort button from the LabVIEW toolbar. Follow the steps below to remove the run button manually and programmatically. You can adapt them to remove the abort button.
Manually:
- Launch LabVIEW.
- Create a new VI, or open an existing VI.
- Browse to File » VI Properties.
- Under the Category drop-down menu, select Window Appearance.
- Click the Customize button.
- Uncheck the Show Run button option as shown in Figure 1. Notice the other available customization options.
- Click the OK button.
- Click the OK button again.
 Programmatically
:
- Launch LabVIEW.
- Switch to the block diagram (Window » Show Block Diagram).
- Build the block diagram shown in Figure 2.

Additional Information
Tips:
- To locate the
Current VI's Path function, right-click on the block diagram, and navigate to File I/O » File Constants. - To locate the
Open VI Reference, Close Reference, and Property Node functions, navigate to the Application Control palette. - To locate the
Simple Error Handler VI, navigate to the Time & Dialog palette. - Once the Property Node is wired to the
Open VI Reference function, left-click on the property and select Toolbar » Show Run Button - In order to wire a false constant to the input terminal of the TB.ShowRunBut (Show Run Button) property, right-click on the TB.ShowRunBut text and select Change to Write.
For more detailed information on window appearance customization options, view the LabVIEW Help (
Start » All Programs » National Instruments » LabVIEW xxxx » LabVIEW Help). Once the help file is opened, switch to the Search tab and type
Window Appearance.