Solution
There are three main steps for troubleshooting this issue: make sure the encoder signal is wired correctly, the camera is setup for triggering, and the frame grabber is setup to trigger a pulse on the camera control lines when a pulse on the encoder signal is captured.
Step 1: Check the wiring of the encoder to the Camera Link I/O Extension Board
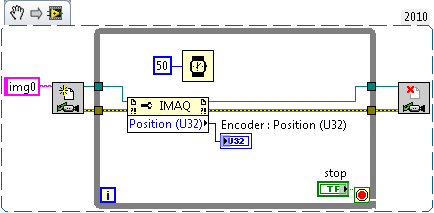
Wire the encoder to the Camera Link I/O Extension Board as described in the User Guide linked below. You can test the wiring by running the following VI (as shown below) for your frame grabber. While this VI is running, spin the shaft connected to the encoder and verify that the position indicator updates appropriately. You should be able to turn the encoder shaft one revolution and see the position change by the number of counts per revolution listed by your encoder specifications.
 Step 2:
 Ensure the camera is configured for triggering
Cameras generally need to be put into a triggered mode by setting a camera attribute.You can set this property through Measurement & Automation Explorer (MAX) or through a camera configuration tool.
Step 3: Setup pulse generation on the frame grabber
To send a trigger to the camera on an encoder value change, the pulse generation section of the camera file needs to configured. Open your camera file in Camera File Generator and select
Settings >> Pulse Generation to bring up the configuration window. Select the appropriate camera control line and select Edit to define a pulse equation.
If this section is not configured you may be able to properly read encoder signals but will not actually send triggers to the camera.
If you have performed these steps and still are not able to acquire images when triggering from an encoder, please contact NI technical support.