Using NI-DAQmx With the LabVIEW API
- Place a DAQmx Channel Property Node on your block diagram and wire it to the DAQmx Create Channel VI.
- Right click on the property node and select Change All to Write
- The exact location of the property varies depending on your Operation Type. For the Analog and Digital Input and Output Operation Types, right click on the property node and navigate to Properties » Operation Type » General Properties » Advanced » Data Transfer and Memory » Data Transfer Mechanism. For the Counter Input and Output Operation Types, you'll need to go to Properties » Operation Type » General Properties » More » Advanced » Data Transfer and Memory » Data Transfer Mechanism.
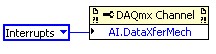
- Right click on the DataXferMech wire terminal of the DAQmx Channel Property Node and select Create » Constant. Choose the type of transfer mechanism you want to use.
 Note:
Note: Make sure you are connected to a compatible device otherwise these options may not be available. Simulating a compatible device in NI MAX will work as well.
With the C API The exact function will depend on the operation type. For example, if you are wanting to set the Data Transfer Mechanism for an analog input task you will call:
DAQmxSetAIDataXferMech( TaskHandle taskHandle, const char channel[ ], int32 mode);
The argument mode can take on one of four different values:
- DAQmx_Val_DMA
- DAQmx_Val_Interrupts
- DAQmx_Val_ProgrammedIO
- DAQmx_Val_USBBulk
See the NI-DAQmx C Reference Help for more detailed information. The NI-DAQmx C Reference Help is located at Start » All Programs » National Instruments » NI-DAQ » NI-DAQmx C Reference Help.
With the .NET APIThe .NET call will also depend on the operation type. If the operation type is analog input you will call:
Task.AIChannels.All.DataTransferMechanism = Mode
Mode can take on one of four values:
- AIDataTransferMechanism.Dma
- AIDataTransferMechanism.Interrupts
- AIDataTransferMechanism.ProgrammedIO
- AIDataTransferMechanism.UsbBulk
Using Traditional NI-DAQ (Legacy) With the LabVIEW API
- Place a Set DAQ Device Information VI on your block diagram.
- Right click on the information type terminal and select Create Constant. Choose the data transfer mode of the operation you want to configure.
- Right click on the information setting and select Create Constant. Choose the type of transfer mechanism you want to use.
 With the C API
To modify the data transfer mechanism in Traditional NI-DAQ (Legacy) you should call:
Set_DAQ_Device_Info( deviceNumber, infoType, infoValue )
The infoType parameter will depend on the operation type. For example if you would like to modify the data transfer mechanism for an analog input operation you should call:
Set_DAQ_Device_Info( deviceNumber, ND_DATA_XFER_MODE_AI, infoValue )
The infoValue parameter can take on one of two different values if you are using a typical E-Series PCI device:
- ND_INTERRUPTS
- ND_UP_TO_1_DMA_CHANNEL
For more detailed information about using the Traditional NI-DAQ (Legacy) C API to set the data transfer mechanism, refer to the Traditional NI-DAQ (Legacy) C Function Reference Help located at Start » All Programs » National Instruments » NI-DAQ » Traditional NI-DAQ Function Reference Help.