Solution
As of LabVIEW 2012 Logos Sockets automatically broadcasts Shared Variables to all available NICs. The process described below is not valid for version 2012 or later.
Normally, the Shared Variable Engine uses the default network adapter for the system on which it is running. In the case of a system having both wired and wireless connections, the wireless connection is generally the default connection. In LabVIEW 8.2.1, the ability to specify which network adapter will be used by the Shared Variable Engine was added. This is done by modifying the appropriate .iniconfiguration file depending on whether the shared variables are being hosted on a Windows-based system or an RT-based system.
For a Windows-based system: If one does not already exist, create a file in the
C:\WINDOWS directory named
logos.ini and add the following lines to the file:
[LOGOS]
ServiceBindTo=XX:XX:XX:XX:XX:XX
where
XX:XX:XX:XX:XX:XX is the MAC address of the Ethernet card to want to bind to. The MAC address can be found by running
ipconfig /all from a command prompt. This will be the
Physical Address as listed by the ipconfig command.
In order for the Shared Variable Engine to bind to this ethernet card, the computer will need to be restarted.
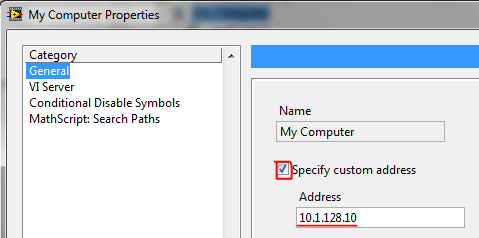
The IP address also needs to be changed to reflect the IP address of the desired network card under the My Computer settings in the LabVIEW Project Explorer.
Right-click on
My Computer within the LabVIEW Project Explorer, click on
Properties. Under the
General tab, click the
Specify Custom Address checkbox, and enter the IP address of the network card that the shared variables will be deployed to.
For an RT-based system
To bind shared variable communication to a specific adapter on an RT-based system, add the following lines to the ni-rt.ini file located in the highest level directory on the target:
[LOGOS]
ServiceBindTo=primary
to bind to the primary adapter, or:
[LOGOS]
ServiceBindTo=secondary
to bind to the secondary adapter.
Other Causes of Communication Trouble
If your RT target is receiving Error -1950679022 from the shared variable error out terminal, then the problem is likely writing to the wrong adapter (see above), or a firewall issue. The Windows Vista Firewall may prevent writing to shared variables hosted by the Vista machine. The firewall can be turned off to allow for RT targets to write to the shared variables published on the Vista host.
Note: As of LabVIEW 8.2.1, you can define what network card will be used for deploying shared variables. In the previous versions of LabVIEW, the Shared Variable engine used the default Ethernet device which can be changed in the Windows OS.
Note: If you are using DAQmx devices in the same LabVIEW project that you change the IP address in, make sure that the 2nd NIC card is always on. If the router is unplugged or the NIC card is disabled this will cause you not to see your DAQmx devices in the related LabVIEW project.