Solution
- Confirm the software stack that you have installed is correct for your FieldPoint.
- Confirm that you are using an operating system that is compatible with the driver.
- This information can be found in the readme of the driver.
- Check the network configuration of your computer and controller following the steps outlined below.
- If the network configuration is correct, reset your controller by holding the reset button and reinstall the software.
Once you have confirmed driver, software version, and operating system compatibility, follow the steps below depending on your network configuration.
Configuration 1: Isolated Network
There is no DHCP server (Dynamic Host Configuration Protocol) to assign IP addresses.
- Direct connection between FieldPoint unit and host computer using a crossover cable.
- Indirect connection between FieldPoint unit and host computer with a hub or switch in the center. Typical straight-through Ethernet cables are used here.
In an isolated network, a static IP must be assigned that matches the subnet of the computer attempting to communicate with the [c]FP-2xxx.
Windows 7:
- Go to Start»Control Panel»Network Sharing Center»Change Adapter Settings.
- Right-click on the Local Area Connection associated FieldPoint connection, and select Properties.
- In the Local Area Connection Properties window, select Internet Protocol Version 4 (TCP/IPv4), and click on the Properties button.
- Select Use the following IP address and enter an IP address and Subnet mask. For this example, we will use the IP address and Subnet mask shown in the figure below. With these settings, the subnet is 192.168.1.0.
- Leave the other fields blank, and click OK and then Close.
Windows XP:
- Go to Start»Control Panel»Network Connections.
- Right-click on the Local Area Connection associated FieldPoint connection, and selectProperties.
- In the Local Area Connection Properties window, select Internet Protocol (TCP/IP), and click on the Properties button.
- Select Use the following IP address and enter an IP address and Subnet mask. For this example, we will use the IP address and Subnet mask shown in the figure below. With these settings, the subnet is 192.168.1.0.
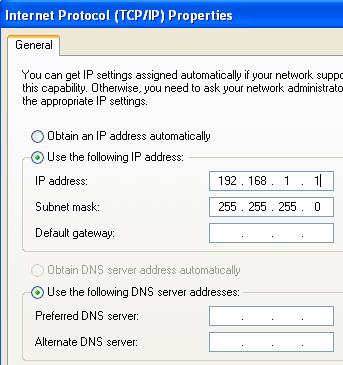
- Leave the other fields blank, and click OK and then Close.
To set the FieldPoint unit to the same subnet:
- Set the FieldPoint unit into a state that will broadcast it to any subnet so that it can appear in MAX.
- For FieldPoint and Compact FieldPoint Real-Time controllers, set the Reset IP and Safe Mode DIP switches to on.
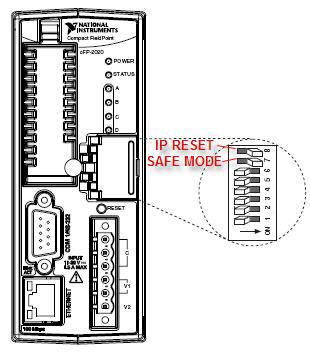
Compact FieldPoint Controller
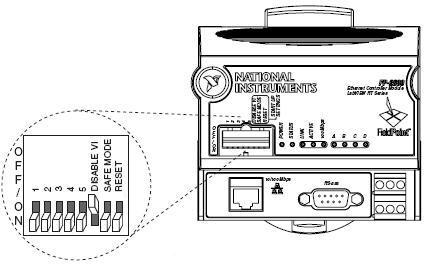
FieldPoint Controller FP-20xx
- For Network Modules such as the cFP-180x and FP-160x, only use the corresponding reset IP dip switch:
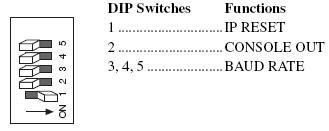
Compact FieldPoint Ethernet Module cFP-180x
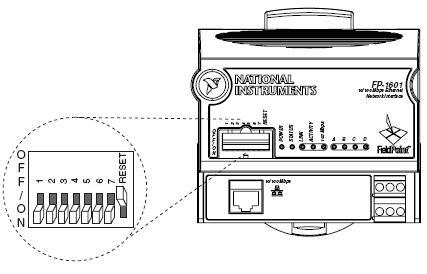
FieldPoint Network Ethernet Module FP-160x
- Either push the RESET button on the FieldPoint unit or cycle power.
- Open MAX by going to Start»Program Files»National Instruments»Measurement & Automation Explorer.
- Expand Remote Systems. The FieldPoint unit should appear as 0.0.0.0. If it does not, go to View»Refresh or press F5 to refresh MAX.
- Click on the unit in remote systems, and select the Network Settings tab in the bottom center.
- Select Use the following IP address under IP Settings, and type in the IP address and Subnet mask.
- Reset the DIP switch(es) back to the off position, and cycle power again.
- The FieldPoint unit should now appear as the specified name in remote systems. Refreshing MAX by going to View»Refresh or by pressing F5 may be necessary.
Configuration 2: Exposed Network
- There is a DHCP server.
- The FieldPoint unit and host computer connect to a network access point, such as a router, on the same network with a standard straight-through Ethernet cable.
In an exposed network, the DHCP automatically assigns IP addresses to both the host computer and the FieldPoint unit. Follow the steps of Configuration 1, with the following exceptions:
- In the Internet Protocol (TCP/IP) Properties window, select Obtain an IP Address Automatically. This most likely is already selected if this network port was previously used for an internet connection.
- In step 6 of the FieldPoint section, just select Obtain an IP Address automatically and continue with step 7.