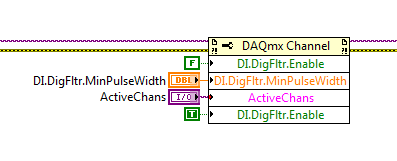
To access these properties in LabVIEW:
- Place a DAQmx Channel Property Node on your block diagram, located at Functions >> All Functions >> NI Measurements >> DAQmx - Data Acquisition.
- Expand the property node to contain 4 properties.
- For the first property, select Digital Input >> Digital Filter >> Enable. Wire a false to this input, which will disable the filter on all lines by default (allowing you to enable the filter only on specific lines).
- Select Digital Input >> Digital Filter >> Minimum Pulse Width for the second property. This is where you set the filter pulse width.
- For the third property, select Active Channels This will allow you to choose specific channels on which you would like to enable the filtering.
- Click on the fourth property box and select Digital Input >> Digital Filter >> Enable. This will enable the filter on the lines that are selected in Active Channels.

To access these properties in C:
In the C DAQmx API reference, there are two properties for digital filtering:
- Enable
- DAQmxSetDIDigFltrEnable(TaskHandle taskHandle, const char channel[], bool32 *data)
- Minimum Pulse Width
- DAQmxSetDIDigFltrMinPulseWidth(TaskHandle taskHandle, const char channel[], float64 data)
To access these properties in Python:
For using the Python API please refer to the example below:
Task = nidaqmx.Task() # Create a Task reference
config = Task.di_channels.add_di_chan('Dev1/port0/line0:7') # Add a DI channel
config.di_dig_fltr_enable = True # Enable the digital filter
config.di_dig_fltr_min_pulse_width = minimum_pw_value # Set the min pulse width valuePython® is a registered trademark of the PSF.