Solution
The serial protocols for certain instruments use a 9-bit date frame, rather than the more common 8 data bits and a parity bit. However, the UART on all NI serial products only supports 5 to 8 data bits, Even/Odd/Mark/Space/None parity and 1/1.5/2 stop bits. Since the UART does not support 9 data bits directly, there is no provision in the driver to accomplish this.
There are two different workarounds that you may be able to use to communicate with 9 bits.
1. Use the parity bit as a 9th data bit:
Transmission:
- You will need to set the port up for 8 data bits.
- To add a ninth bit to your transmission, you will need to explicitly set the parity bit to Mark or Space for every byte that is transmitted. Mark is a high parity bit (1), and Space is a low parity bit (0).
For example, if you need to transmit binary 000100010, you would transmit hex 0x88 and set the parity to Space. If you needed to transmit binary 000100011 instead, you would still transmit hex 0x88 but set the parity to Mark. Note that when shown in binary the least significant bit is the leftmost bit, as the least significant bit is sent first in serial transmission.
Reception:
- Set the port up for 8 data bits with parity checking enabled, set as either Space or Mark.
- Read one byte at a time.
- If you get any parity errors, you know that the 9th bit is the opposite of what you set.
- Append the appropriate bit.
For example, let's say you set your parity as Space. If you read in a byte and you get a parity error, you know that the 9th bit is Mark and can append the appropriate bit.
One issue with this is that in LabVIEW 7.0 and later, when NI-VISA receives a data byte with incorrect parity, it completely replaces the serial data with the error character, which by default is 0. LabVIEW 6.1 and earlier does not replace a data byte with a parity error replacement byte. You can change this behavior by modifying the visaconf.ini file.
Note that if your instrument only needs to receive the 9th data bit for addressing purposes, but never sends data on the 9th bit, you should only need to set the parity once to what your instrument is expecting.
How to modify the visaconf.ini file to disable the error replacement bit:
For users of Windows XP, the visaconf.ini file is located in the <Documents and Settings>\All Users\Application Data\National Instruments\Nivisa folder.
For users of Windows Vista or later, the visaconf.ini file is located in the C:\ProgramData\National Instruments\NIvisa folder.
Add the following lines to the file and save:
[ASRL-RSRC-ALIAS]
DisableErrorReplacement=1
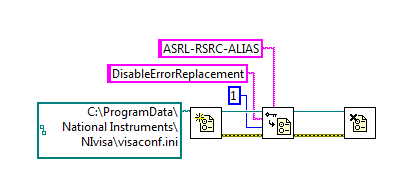
Some users of LabVIEW 2010 may notice that this key can be lost when restarting their computer or opening Measurement and Automation Explorer. To ensure that the key is always present within the visaconf.ini file at run time, it is possible to add the key programatically using the following code:

The file path in the code above must be modified to match the location of the visaconf.ini file on the local machine.
2. Use a separate microcontroller that handles 9-bit frames:
Another option is to use a separate microcontroller with a UART that is made to handle 9 data bit frames and place it as an intermediary between the instrument and the computer. The computer would send two 8-bit data frames for each 9 bit frame, one with the first 8 bits, the second with the 9th bit, and have the UART reassemble this into one 9-bit frame to send to the instrument. Similarly the UART would receive a 9-bit frame from the instrument and return two 8-bit frames to the computer.