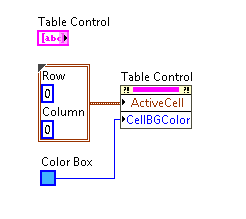
You can set the cell color of elements in a table by using a Property Node in LabVIEW:
- To create a property node, right-click your table and select Create»Property Node»Active Cell»Active Cell and then drop the property node on the block diagram.
- Expand the property node on the block diagram to have two elements.
- Click the second element and select ActiveCell»Cell Background Color.
- Right-click the property node and select Change All to Write, which will allow you to set these properties.
The next step is to wire appropriate values to these properties. The ActiveCell property is a cluster of 2 numeric values. The first represents the desired Row and the second represents the desired Column of the cell that you wish to change. In addition to changing the background color of a single cell, you can set the active cell to the following values.
| Row | Column | Result |
|---|
| -2 | 0 | Selects all cells of the first column, including the column header |
| -2 | -2 | Selects all rows and columns, including column headers |
| -1 | 0 | Selects the header of the first column |
| -1 | -2 | Selects the headers of all columns |
The CellBGColor property expects a hexadecimal color value with the following syntax: RRGGBB, where the first two hex values are for red, the next two for green, and then blue. You can wire either a Numeric or a Color Box control to this input. The following image shows what your block diagram may look like:
