Solution
This error is caused when a DAQmx application tries to access a custom scale that does not exist on that particular machine (e.g. incorrect scale name, scale was deleted, etc.). If this behavior only occurs on a deployment machine, the system may be trying to use a custom scale that was created on your development machine, but was not exported to your deployment machine.
To fix
Error -200378, you must export your custom scales to your stand-alone target machine from your development machine. There are two main ways to export your scale with your application:
Method 1:The first method is to create a custom scale inside of your project (rather than in MAX) on development machine so that it will be added with your executable. To do this, from the Project Explorer window right-click
My Computer»New»NI-DAQmx Scale (as pictured below). When doing this your scale will be added to an .ini file that is created in the build folder of your executable.
Method 2:
If you have a custom scale that has already been created, or any other Measurement & Automation Explorer (MAX) configurations that you would like to include (tasks, virtual channels etc.), you can choose to include your configuration settings in an installer.
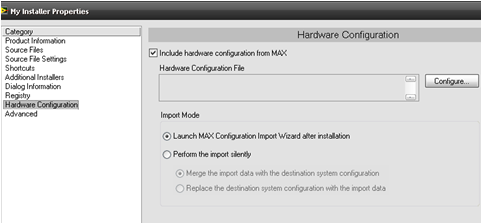
To do this in LabVIEW 8.2 or later, right-click Build Specifications in the Project Explorer window and select New»Installer. Once in the My Installer Properties window navigate to Hardware Configurationunder the Category menu on the left side. Place a checkmark in the box titled Include hardware configuration from MAX, and then click the Configure... button to select various tasks, scales etc. to include with your installer.
You can also choose to launch the configuration import wizard after installation to choose what settings you would like to import from your configuration file, or just have everything install silently during the install process. Refer to This KnowledgeBase Article for more information about the MAX configuration wizard.
