Access Front Panel Controls in a LabVIEW Executable From Another VI

Updated Jan 13, 2026

Environment

Software

  • LabVIEW Full
  • LabVIEW Professional
  • LabVIEW Application Builder Module
  • LabVIEW Base

Programming Language

  • LabVIEW G

This article demonstrates how to remotely access the Controls and Indicators on the Front Panel of an LabVIEW executable from within another VI. This may be required if you wish to programmatically read or write the values of the Controls in real-time.


An example is attached to the bottom of this article.


Pre-requisites

  • A network connection between the system(s) running the VI and executable.
  • The VI and executable must be using the same version of LabVIEW.
    • i.e. if using LabVIEW 2025 Q3 to develop your VI, the executable must use LabVIEW Runtime 2025 Q3.

Follow the steps below to programmatically access Controls and Indicators inside a built executable:


  1. In the directory where your built executable is saved, open the <Application Name>.ini file with a text editor.
  2. Add the following lines to the end of the INI file:
    • Note: the port number 3364 is an example. You can choose a different port, as long as that port is available on your system. The default is 3363.
server.tcp.enabled=True
server.tcp.port=3364
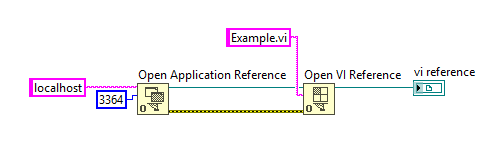
 

  1. In LabVIEW, create a new VI that will programmatically retrieve the Front Panel objects of your executable.
  2. On the VI's Block Diagram, place an Open Application Reference function. Set the following inputs:
    1. Machine name should be set to the IP address of the system running the executable. If using the same system, enter localhost.
    2. Port number or service name should be set to the same port as configured in the INI file.
  3. Next, place an Open VI Reference function. Set the following inputs:
    1. Application reference should be connected to the application reference output of Open Application Reference function.
    2. VI path should be set to the name of the startup VI used for the executable.


  1. Place a Property Node and configure:
    1. The active property as Front Panel.
    2. Connect vi reference from the Open VI Reference function to the reference input.
  2. Place another Property Node immediately after and configure:
    1. The Panel reference from the previous Property Node to the reference input.
    2. The active property to Controls[].


  1. Next, place a For Loop to iterate through the array of Control references.
  2. Connect the Controls[] output from the Property Node to the edge of the For Loop, and ensure that the tunnel is indexing.
  3. Inside the For Loop, place a Property Node and configure:
    1. The indexed array of Control references as the reference input.
    2. The active property to Label >> Text.
  4. Place a Case Structure after the Property Node and configure:
    1. The Case Selector to be the Label.Text property.
    2. A new case for each Control or Indicator on the Front Panel of your executable. Remember to set one case as the default.


  1. In each case:
    1. Ensure that the case name is set to a valid name of a Control or Indicator.
    2. Place a Property Node and set it's active property to Value.
  2. Depending on whether you wish to read or write the Control or Indicator, set the Value property to read or write respectively.
    1. The below image shows an example of writing a new value to a Control called X.


The example attached to this article consists of an executable that consists of two Controls (X and Y), and adds these values to display on an Indicator (X+Y). The VI that remotely connects to the executable:


  • Writes a new value to the X Control.
  • Writes a new value to the Y Control.
  • Waits a few milli-seconds, to allow the executable to update.
  • Reads the new value stored in the X+Y Indicator.

To run this example:


  • Ensure that you are using LabVIEW 2020 or newer.
  • Open the Access EXE Control.lvproj file.
  • Build the application from the Build Specification.
    • Modify the application's INI file, as detailed in step 2.
  • Run the built application.
  • Run the Connect to EXE.vi and test the behaviour when setting new values for X and Y.

Additional Information

Creating VI server settings from the Tools>>Options>>VI Server menu only applies to VIs that are not being run from within a project. If you want to set these settings for a VI within a LabVIEW project, you will need to set these settings through VI Server Property Nodes.

This method allows you to make changes in the VI reference of the executable but not the executable itself. If you would like to modify the controls of the executable you will need to take another approach and use shared variables instead.