Solution
This issue may occur for several reasons:
The PXI RT Target is configured for a remote subnet:If the RT Target had been previously configured then moved to a new subnet it may not be listed in Remote Systems in MAX. You will need to reset the IP address (refer to your specific controller's product manual to determine what it will reset to) and then reconfigure the IP settings in MAX.
- For PXI-818x, 819x, 810x, 813x and 811x controllers, you can reset the IP address in BIOS.
- During boot press the <Delete> key to enter BIOS setup
- Navigate to the LabVIEW RT section of the BIOS setup
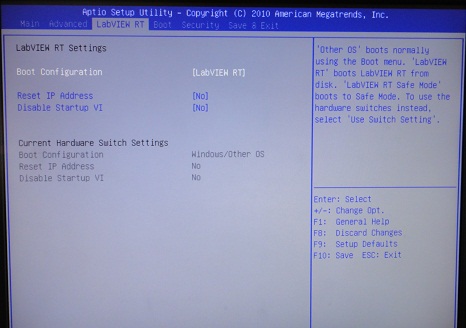
- Highlight Reset IP Address, press the <Enter> key, and select Yes from the sub-menu
- Exit BIOS saving changes
- For PXI-815x and 817x controllers, an IP Reset Disk must be used.
- Create the RT PXI IP Reset Disk in Measurement & Automation Explorer by selecting Tools»RT Disk Utilities»Create IP Reset Disk
- Insert the IP Reset Disk into the controller, reboot it, and wait for the controller to finishing booting
- Remove the disk, insert the RT PXI Boot Disk if necessary, and reboot the controller
- For PXI-814x controllers, as well as most others, you can reset the IP using DIP switches on board the controller. This option may be preferable if you do not have access to an extra monitor, keyboard, and mouse such that you can access the BIOS as mentioned above. To reset the IP Address using DIP Switches.
- Turn off the chassis, and remove the controller.
- Move the IP Reset switch into the On position. Refer to your controller's user manual which will indicate the location of this switch.
- Replace the controller and power on the chassis.
Once the IP Address has been reset, it will come back on with a DCHP IP Address or 0.0.0.0 depending upon the controller. Ensure your computer is set to DCHP as well, or that you are connected to a router that will properly assign an IP to the PXI controller.
The Startup VI is causing connection issues:The Startup VI could be broken, corrupted, or consume high CPU resources causing the RT to lose communication with the network. To validate this, test the network connection with the Startup VI disabled. This can be done from the BIOS configuration as shown in the image above:
- Highlight Disable Startup VI, press the <Enter> key, and select Yes from the sub-menu
- Exit BIOS saving changes
PXI RT Target with multiple Network Cards:If a PXI RT Target has multiple network cards, LabVIEW Real-Time defaults to the fastest network card as the primary network card. If the fastest network card is a PXI network card such as the PXI-8243, you will have to discover and configure the PXI target using this network card.
Similarly, if your PXI controller has multiple ethernet ports, always connect to the first port when setting up and configuring your PXI chassis.
Firewall:Some Firewall settings may prevent the RT Target from being listed in MAX Remote Systems. This can be resolved by disabling the firewall or opening Port 44525.
If disabling the firewall does not resolve the problem, or if you are unable to disable the firewall because its settings are controlled by group policy, you can leave the firewall enabled but specifically allow MAX through.
- Open Network Connections Control Panel, located in Start»Settings»Network Connections; this will result in listing the local networks.
- Right-click any connection and select Properties.
- Select the Advanced tab.
- Click Settings.
- Select the Exceptions tab.
- Click Add Program...
- Select Measurement & Automation in the list and click OK.
- Click OK on both remaining windows.
- Now MAX will be able to communicate with your real-time controller.
For additional information about firewall settings refer to the
Configuring Software and Hardware Firewalls to Support NI Products.
Host computer with multiple network cards:If the host computer has multiple network cards (for example, a laptop with an ethernet port and wireless card), occasionally the priority of the network cards can affect your ability to connect to the target. If none of the other options here resolve the problem, and the host computer has multiple network cards, follow the steps in
External Link: How to Change the Network Connection Priority in Windows 7 and set the connection for your controller to the highest priority.
Incompatible BIOS version:If the BIOS version on the controller is not correct or up-to-date, the controller may have issues booting into the correct OS. The PXI PS driver will also fail to search for the controller.
Make sure the BIOS version on the controller is up-to-date. Navigate to
Software and Driver Downloads to search for the BIOS applicable to your controller. Search for the term like "8880 firmware".
Follow the readme instructions for the update procedure.
The software in the target might have become corrupted:If none of the steps above solve this issue, you should consider the possibility of booting your Real-Time PXIe in Safe Mode, reformatting and reinstalling its software.
- Find your user manual specific to your PXIe controller.
- In the manual, find the section that describes the controller's LabVIEW RT Configuration Switches.
- Follow the instructions on the manual to boot the controller in Safe Mode. This will usually imply that you'll need to take the controller out of the chassis and change the position of the Safe Mode switch to ON.
- Connect the controller directly to PC via Ethernet cable (not through a switch).
- If the minimum required software is installed on the host computer, the chassis should appear in NI MAX under Remote Systems .
- Reformat the target and reinstall its software. If you are not sure how to do so, please refer to this article: How to Restore LabVIEW RT Target to Factory Default Configuration.
- Once the software was reinstalled, move the Safe Mode switch back to the OFF position.
The software in the Host PC might have become corrupted:Make sure the version of PXI Platform services listed on NI MAX matches the installed version of PXI Platform Services on the NI Package Manager. If not, it can be an indication that the software is corrupt and not allowing NI MAX to correctly find the controller.
Reinstall PXI Platform Services