To communicate with a serial port on your cRIO, the NI-VISA driver is required. If you're unable to see the serial port, ensure that the correct version of the driver is installed.
The following steps show how to install NI-VISA on your cRIO:
1. Open NI Measurement & Automation Explorer (MAX) and find your cRIO. This should be under
Remote Systems.
2. Click the arrow to the left of the device to display the device's contents.
3. Right-click
Software and select
Add/Remove Software.4. A dialog box will pop-up displaying the available software that can be installed on the cRIO.
5. Select the version of NI-VISA that matches the LabVIEW version you are using (e.g. NI-VISA 18.0 for LabVIEW 2018).
6. Click
Next once you have made the selection.
7. Next it will ask you what specific modules you would like to install on your device.
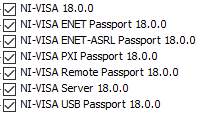
8. Leave the selection as default and make sure the following are selected to be installed:

9. Click
Next, review your selections and then click
Next to start the installation.
10. Once the installation is complete, close and re-open NI Measurement & Automation Explorer (MAX). Check under your cRIO device whether you can see the serial port.
- This will be located under Remote Systems>>cRIO XXXX>>Devices and Interfaces>>ASRL1:: INSTR.

11. If the port isn't visible, open LabVIEW and add the cRIO as a target.
12. Right-click the target chassis and select
Deploy All.
13. Create a new VI and place a
VISA Open Function.
14. You should now be able to see your serial port listed as a
VISA Resource Name, as shown:
