Solution
For synchronization configurations of multiple DSA cards the synchronization scheme must be compatible with all cards being used. The two types of synchronization are Reference Clock and Master Sample Clock Synchronization. Reference clock synchronization uses the PXI/PXIe backplane clock and the Master Sample Clock synchronization exports a clock from one card to be used by all of the other devices. The breakdown of which DSA devices support which synchronization method is as follows:
Reference Clock Synchronization:
- PXI-4461 and PXI-4462
- PXIe-4463 and PXIe-4464
- PXIe-4480 and PXIe-4481
- PXI/PXIe-4492, 4495, 4496, 4497, 4498, and 4499
Master Sample Clock Timebase Synchronization:
- PXI/PCI-4472/B and 4474
- PXI/PCI-4461 and 4462
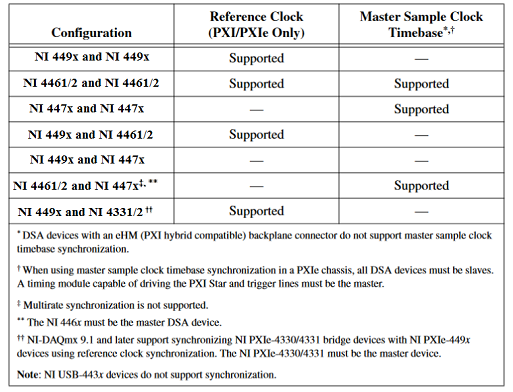
Based on the above list we can identify which devices can be synchronized together and which device sets are incompatible. The below table provides a visual of some of the device pairings as well as a few exisiting caveats, but is not an exhaustive list of device pairings.
After the synchronization type has been chosen to fit your hardware configuration the steps to synchronize are as follows:
Reference Clock Synchronization (PXI/PXIe Only):
- Specify PXI_CLK10 or PXIe_CLK100 as the reference clock source for each device to force the DSA devices to lock to the reference clock on the PXI/PXIe chassis.
- Refer to the device specific specifications document to determine which reference clock source the device can accept. This information can generally be found in the timing or synchronization sections of the specifications documents.
- Choose a master device to issue a sync pulse on one of the PXI/PXIe Trigger lines. The sync pulse aligns all the clocks in the system to within nanoseconds and also resets the ADCs and DACs.
- The current generation of DSA devices (PXIe-4463, PXIe-4464, PXIe-4480/1) are ready to receive and will send a sync pulse at the Committed state of an NI-DAQmx task. The previous generation of DSA devices (PXI-4461/2 and PXI/PXIe-4492/5/6/7/8/9) are ready to receive and will send a sync pulse at the Start state of an NI-DAQmx task. So when synchronizing between these sets of devices they will need to be in the appropriate states such that all sync pulse slave devices are prepared to receive and the sync pulse master will be sending the sync pulse.
- Read the SyncPulse.SyncTime NI-DAQmx Timing property on all of the devices that are importing the sync pulse. Calculate the maximum value, and write it to the SyncPulse.MinDelayToStart NI-DAQmx Timing property on the device that is exporting the sync pulse.
- Configure one of the DSA devices in the system to export its start trigger on one of the PXI/PXIe trigger lines. In this case, the configuration information for all the devices that are importing the sync pulse must be manually configured to the appropriate state.
- To manually commit a task, use the NI-DAQmx Control Task VI with a value of Commit wired to the action control.
- If attempting to synchronize between a current generation (PXIe-4463, PXIe-4464, PXIe-4480/1) and previous generation (PXI-4461/2 and PXI/PXIe-4492/5/6/7/8/9) of DSA devices, a current generation device must be the Master Start Trigger source.
- Start all of the devices that are importing the start trigger by using the NI-DAQmx Start Task VI. Finally, start the device that is exporting the start trigger. This will cause all devices in the system to start acquiring and generating data simultaneously.
Master Sample Clock Timebase Synchronization:
- Program the master device to export its sample clock timebase to all the slave devices. This shared clock guarantees that all ADC and DAC clocks share the same oversample clock. The signal is routed on PXI Star for PXI/PXIe systems and any of the RTSI lines for PCI systems. The default RTSI line is 8.
- Program the master device to route a sync pulse to all the slave devices. For PXI/PXIe systems, you can use any of the PXI/PXIe trigger lines to route a sync pulse to all slave devices. For PCI devices, the default RTSI line is 9, but you can program another RTSI line. The sync pulse aligns all the clocks in the system to within nanoseconds and also resets the ADCs and DACs.
- Read the SyncPulse.SyncTime NI-DAQmx Timing property on all of the devices that are importing the sync pulse. Calculate the maximum value, and write it to the SyncPulse.MinDelayToStart property on the device that is exporting the sync pulse.
- Configure one of the DSA devices in the system to export its start trigger on one of the PXI/PXIe trigger lines for a PXI/PXIe system, or one of the RTSI lines 0 to 6 for a PCI system. If possible, configure the device that is exporting the sync pulse to also export the start trigger. However, if the application demands it, separate devices can export the sync pulse and start trigger. In this case, the configuration information for all the devices that are importing the sync pulse must be manually committed prior to starting any of the devices. To manually commit a task, use the NI-DAQmx Control Task VI with a value of commit wired to the action control.
- Start all of the devices that are importing a start trigger by using the NI-DAQmx Start Task VI. Finally, start the device that is exporting the start trigger. This will cause all devices in the system to start acquiring and generating data simultaneously.