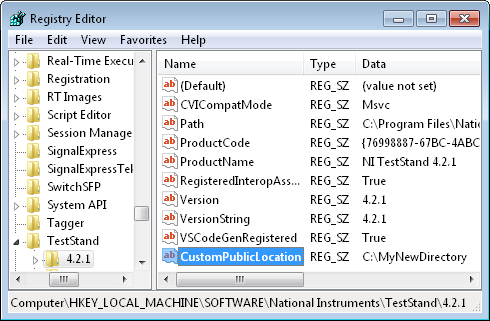
You can modify the registry to specify a custom directory that TestStand will use as the TestStand Public directory. Depending on whether TestStand has been installed, there are two different procedures to follow to change the public directory.
WARNING: Inappropriate changes to the Windows Registry can disable your operating system! To safeguard against such an event, you should backup your existing Registry by choosing
File»Export after launching the Registry Editor and
before making any changes.
Creating a New Public Directory When TestStand is Already InstalledOpen the registry editor by going to the Start menu, selecting Run and typing "regedit". Navigate to HKEY_LOCAL_MACHINE\SOFTWARE\National Instruments\TestStand\<version>\ (If you are using Windows Vista x64 or Windows 7 x64, navigate to HKEY_LOCAL_MACHINE\SOFTWARE\Wow6432Node\National Instruments\TestStand\<version>\). Create a new string value by right-clicking the <version> key and selecting New»String Value. Name the key 'CustomPublicLocation'. Double-click on the key and set the Value Data to the location of your new public directory. Make sure that the value of the key is a valid directory that already exists.

Once you have created this registry key, you will then need to copy the folders from the default public directory to the new public directory that you have specified. The TestStand public directory is located by default at
C:\Documents and Settings\All Users\Documents\National Instruments\TestStand x.x on Windows 2000/XP and at
C:\Users\Public\Documents\National Instruments\TestStand x.x on Windows Vista/7.
Note: Having a Custom Public directory is not a fully tested feature. It is possible to run into unexpected behavior if using this method.
Note: If you follow these steps and create a custom public directory, it is important to leave the original files in place in the original public directory location. When TestStand is launched, the TestStand installer checks to make sure that all the default directories are accounted for, and will attempt to reinstall the default directories if it does not find them.
Creating a New Public Directory Before Installing TestStand
If you have not yet installed TestStand, you will have to create the structure of the registry keys before adding the string value.
Open the registry editor by going to the Start menu, selecting Run and typing "regedit". Navigate to HKEY_LOCAL_MACHINE\SOFTWARE (If you are using Windows Vista x64 or Windows 7 x64, navigate to HKEY_LOCAL_MACHINE\SOFTWARE\Wow6432Node). If the National Instruments key does not exist, create it underneath the SOFTWARE key by right-clicking SOFTWARE and selecting New»Key. Enter National Instruments as the name of the key. Then under the National Instruments key, create a new key called TestStand. Then under the TestStand key, create a new key with the version of TestStand that you will be installing. Finally, create a new string value under the version key called 'CustomPublicLocation'. Set the value of this new key to the location of your new public directory. Make sure that the value of the key is a valid directory that already exists.
Once the registry key has been created, you can install TestStand.
Note: If you follow these steps and create a custom public directory, it is important to leave the original files in place in the original public directory location. When TestStand is launched, the TestStand installer checks to make sure that all the default directories are accounted for, and will attempt to reinstall the default directories if it does not find them.