Solution
There are two ways to modify the Frame Trigger.lvproj example to be 2-Tap, depending on the version of Vision Acquisition Software you have installed.
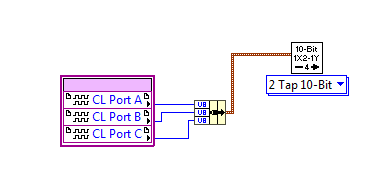
Vision Acquisition Software September 2016 and LaterAs of Vision Acquisition Software September 2016, you can now change the tap configuration of the example by choosing the polymorphic instance of 2-Tap for the
IMAQ FPGA CameraLink VI.
You will also need to update the
CameraLink Data input to reflect the number of ports you are reading from. For this tap configuration, we will be reading from Port A, B and C.
 Vision Acquisition Software August 2016 and Earlier
If you are using an older version of the driver, you can perform the following steps to change the example to a 2-Tap configuration.
Note: These steps are specific to a 2-Tap 10-Bit Camera with vertical interlacing configuration. Other configurations can be made by modifying the following steps to your specific camera configuration.
- Open up the example so you can see the Project Window.
- Expand the FPGA Target (PCIe-1473R) option and open the 1-Tap 10-Bit Camera with Frame Trigger (FPGA).vi.
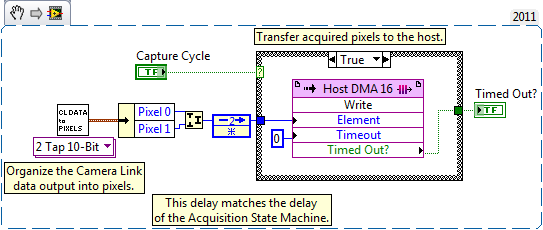
- Scroll over to the CL Data to Pixels.vi and change the drop down menu to 2 Tap 10-Bit.
- Add another name to the Unbundle by Name node and also add a Join Numbers function.
- Wire both of the Unbundled names to the inputs of the Join Numbers function and wire the output of the Join Numbers to the Feedback Node as shown in the picture below.

- In the Project Explorer Window, right click on the Host DMA 16 FPGA FIFO and select Properties. In the Data Type Category, change the data type to U32.
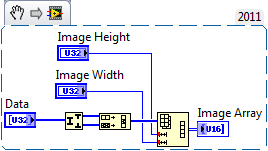
- Open up the 1-Tap 10-Bit Camera with Frame Trigger (Host).vi and scroll over to the Invoke Method with the follow note above it: Read one frame from DMA FIFO.
- Inside the following Case Structure, add a Split Number function
- Wire the results of the Split Number function to an Interleave Arrays function.
- Wire the output of the Interleave Arrays function to the input of the Reshape Array function. These steps can be seen in the picture below.

This will now allow you use a 2-Tap 10-Bit camera with vertically interlaced tap configuration.