このコンテンツは設定された言語で表示できません。

このコンテンツは表示可能な別の言語で表示されています。 お使いのブラウザに翻訳機能がある場合はご利用ください。

Configuring the Property Nodes of Each Channel Separately

Updated Aug 12, 2025

Reported In

Hardware

  • NI-9361
  • NI-9326

Software

  • LabVIEW

Driver

  • NI-DAQmx

Issue Details

I am having one of the issues below: 

  • When configuring a counter read task and mapping the counters to the physical inputs, I am getting the same readings for each channel.
  • I'm trying to change a property for just one channel in a DAQmx task, but the change is being applied to all the channels in the task
  • How do I use the ActiveChans property correctly? 

Solution

When mapping the terminals to the counters, we need to specify the active channel we want to modify. This can be done by declaring the ActiveChans on the property list, which receives a string as an input. 

On the example below we create a single task with two channels and map the ctr0 to PFI0 on channel Frequency_0 and map the ctr2 to PFI2 on channel Frequency_1


This can be used with any property accessible through the DAQmx Channel Property Node after declaring the active channel not just for counter tasks. Additionally, you can create a task using the DAQ Assistant and convert it to DAQmx by following the steps in this article: Automatically Generate LabVIEW NI-DAQmx Code - NI.
 

Additional Information

When writing to a property node, it's processed from top to bottom. This means that if no active channel is defined before, the property node will apply for all channels on the task. 

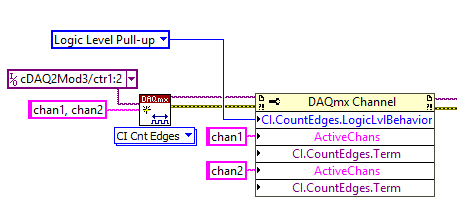
On the example below, we are setting the logic level behavior for both channels while setting the counter input terminal separately for chan1 and chan2. In this case, just one Create Channel function was used. However, it contains 2 different channels (ctr1 and ctr2) that you can modify their properties individually using the ActiveChans function. You can reference them by the names chan1 and chan2.