Connecting two terminals of incompatible data types results in a broken wire, and hence a broken VI with errors. For this case, it is most likely the Boolean data type being connected to the Digital Waveform data type on the input terminal of the Digital Waveform Graph itself.
To solve this, you will need to convert from Boolean to a compatible data type (Digital Waveform in this case).
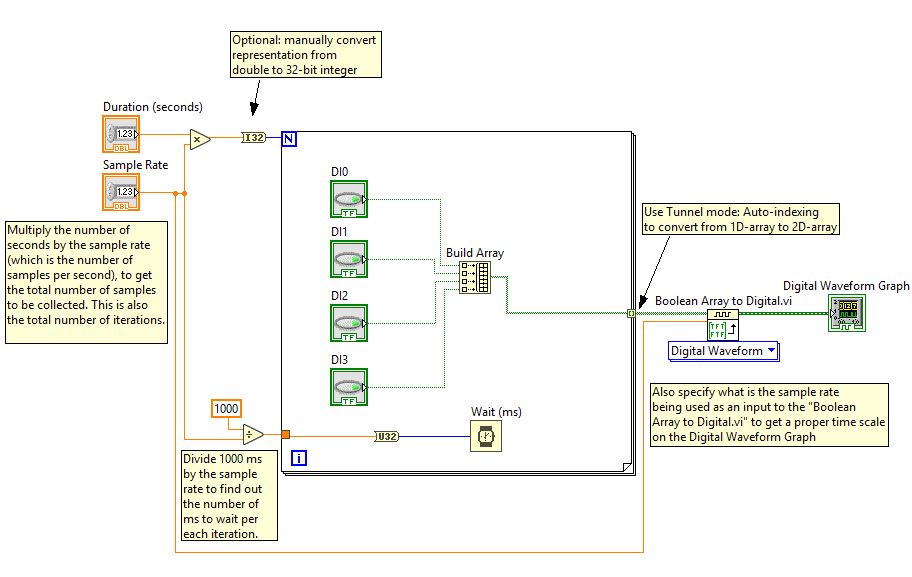
The following steps explain how this can be done, with reference to the example found in the figure below:
- Connect the Boolean data terminals (could be boolean input values from multiple digital lines) to a "Build Array" function, and resize the function to include as many nodes as required. This will convert the individual boolean values into a 1D Boolean array.
- Next, connect the output of this "Build Array" function to the an auto-indexing tunnel on the right edge of the for loop, so that the 1D Boolean array is converted to a 2D Boolean array, which will store data for all iterations to be plotted. This is also required since the next function accepts a 2D Boolean array as an input.
- Then, connect the output of the auto-indexing tunnel to a "DWDT Boolean Array to Digital" function.
- Finally, you can wire the output of the "DWDT Boolean Array to Digital" function to a "Digital Waveform Graph".
- The remaining parts of the code are shown in the free labels on the block diagram for additional documentation.
Additional Information
For more time accuracy, it is recommended to use a timed loop, if working on a real-time operating system, especially for loop iterations of less than 1 ms to be precise and reliable.
The method above is sufficiently reliable for slower loop iteration rates such as 10 ms per iteration, which would correspond to 100 Hz sample rate.
You can also modify the code to run continuously using a while loop, which might also require additional modifications.