Solution
An INF file, or Setup Information File, is a plain text file used by Windows mostly for device driver installation for hardware components. You can include the INI (initialization) file in the project, but it is not necessary.
There are two INF files generated by the NI-VISA Driver Development Wizard:
- one for Windows XP/2000
- another for Windows 7/Vista.
They will only work for their respective operating systems.
To install the driver on a Windows XP/2000 machine, you must copy the file into the
SystemRoot\inf folder. The device must not be plugged into the computer prior to this; otherwise the device will need to be removed from the Windows Device Manager.
To install the driver on a Windows 7/Vista machine, right-click the file and select
Install so that the contents of the file will be applied to the system. The following steps show how to include the INF file in the installer and place them in the
system\inf folder on the installation machine. Although the example shows two INF files, one each for the respective operating systems, you will only need to include the one(s) generated by the wizard that are necessary for the application.
-
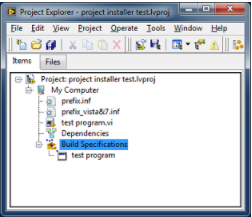
You must first include the INF files in the project and create your executable. Right-click on Build Specification and select NEW -> Installer.
-
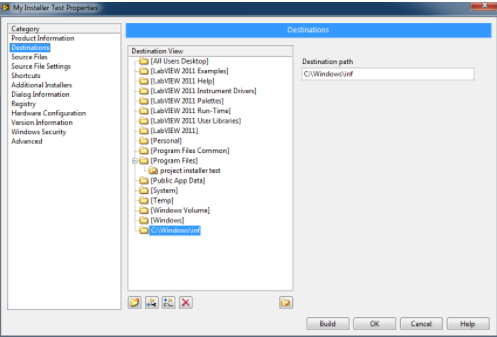
In the Installer properties, under the Destination category, create the required folder to place the INF files into. To do this, you must select the Add Absolute Path button and specify the destination path as C:\Windows\inf
-
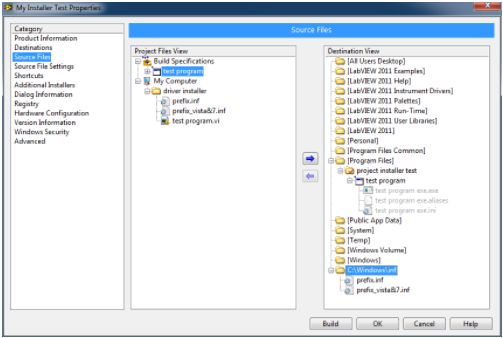
In the Source Files category, the INF folder will appear in the Destination View on the right. Expand the folders in the Project Files View and place the INF files into the INF folder; then specify the destination of the other files.
- Configure any other settings and then Build the installer. Your INF files will now be placed in the appropriate folders on the installation machine.