There are several ways to accomplish this. Each method requires you to set default values and to initialize the array control to default values when the VI is run.
Set Default Values:
Option 1: Manually type in default values
- Type in values to which you would like to initialize your array control into the control on the front panel.
- Left-click on the outer border of the array control, ensuring that the dashed blue selector box encompasses the entire array control.
- Right-click and select Data Operations»Make Current Value Default.
Option 2: Use the Initialize Array function to auto-populate your array with default values.
- Add an Initialize Array function to the block diagram.
- Create constants for the array dimensions and value.
- Create an array indicator on the output. Run the VI.
- Right-click the array indicator and select Data Operations » Make Current Value Default.
- Right-click the array indicator and select Change to Control.
Reinitialize to Default Values:
- You can re-initialize the array control to default values manually by right-clicking the array control before running the VI and selecting Data Operations»Reinitialize to Default Value.
- To do this programmatically, right-click the array control on the block diagram and select Create»Invoke Node»Reinitialize to default.
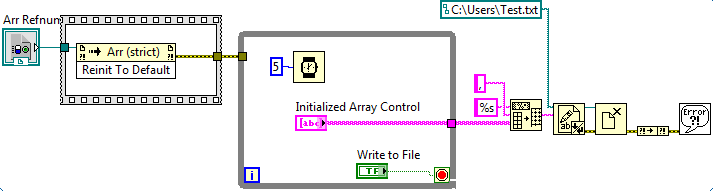
Put the initialized array control in a while loop to allow the user to edit it. To ensure the array control is initialized immediately when the VI is run, wire the error wire into the while loop to enforce data flow. The below code allows the user to edit an initialized array and write those values to a text file.