This article will discuss how to do this with the System Exec VI in a Shell-like interface. If you are interested in an alternative method please see Using WebDAV to Transfer Files to Your Real-Time Target.
1. Set up a IDE of your choice
To target NI Linux Real-Time in C/C++, you need a cross-compiler and an integrated development environment (IDE). NI provides extensive documentation based on GNU C & C++ Compile Tools as well as Visual Studio Code. You can use this documentation to create your own toolchain, too. For more information, visit Getting Started with C/C++ Development for NI Linux Real-Time.
2. Write and compile your C or C++ program
Using the IDE of your choice, write your C or C++ program. Use the information found in
Getting Started with C/C++ Development for NI Linux Real-Time to debug and cross-compile your program.
The following code block is an example written in C, which will be used as a reference:
#include <stdio.h>
int main(int argc, char *argv[])
int sum, num1, num2 = 0;
if(argc == 1)
printf("no arguments specified");
else if(argc == 3){
sscanf(argv[1], "%d", &num1);
sscanf(argv[2], "%d", &num2);
sum = num1+num2;
printf("%d", sum);
}
else
printf("incorrect number of arguments specified");
return 0;
}
Following up with this example, the C code file will be called main.c and the compiled file will be called test.3. Copy the file over to the targetThe easiest way to do this is to use a mapped-drive with WebDAV protocol on Windows 7 to
home/lvuser directory on the LinuxRT target. For more information, see the KnowledgeBase article in 'Related Links' below, on using WebDAV to transfer files to your real-time target.
4. Set the file permission for read and execution SSH into the target and set the appropriate permission to the
test file by typing in
chmod 777 (777 argument changes the permission of the file to read, write, and execute for all).
E.g.:
chmod 777 /home/lvuser/testTo SSH into the target, any terminal program (e.g. PuTTY) can be used. Use the regular target IP address and port number
22.
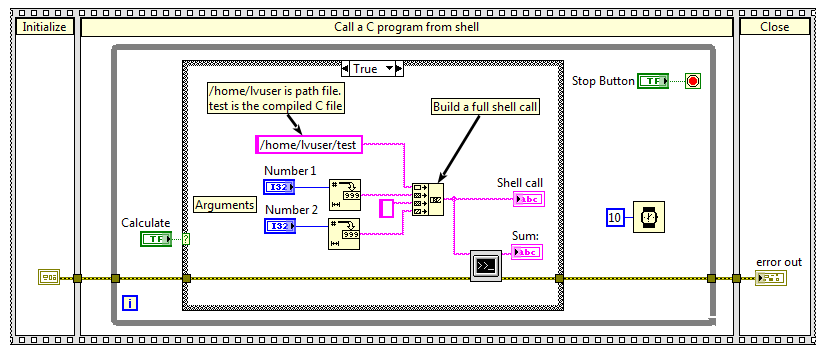
5. Access and run the file from LabVIEW Write a simple LabVIEW application that concatenates the
test file called and arguments into a Shell call string, and use the
System Exec.vi to call the compiled C code. See below for an example.
Additional Information
There are two general ways to run custom C or C++ code on a LinuxRT device in a LabVIEW VI. The user can either compile the code into an executable and run it using the System Exec VI, or a shared library can be compiled and functions can be accessed with the Call Library Function Node.