Solution
There are a number of problems that can result in an executable not running on start-up. Follow the troubleshooting steps below for the settings that are applicable for your system.
- Ensure that the Real-Time Application is set as the start-up application.
- Right-click on the application within the LabVIEW project, and select Set as startup as shown in Figure 1 below.
- Once an executable has been set to run at start-up, you will notice that the specified build is enclosed in a green box.
- If you choose Run as startup , LabVIEW will inquire as to whether you want to restart the device. When the controller is rebooted, your application should load on start up.
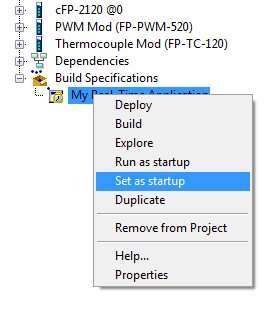
Figure 1: Set Application as Startup in the LabVIEW Project
- Check your device manual to determine if you have a NOAPP DIP switch, and if so, ensure that the Physical NOAPP DIP switch is set to 'OFF.'
- If applicable, locate the hardware DIP switch, change it to the 'off' position, and reboot the controller.
- Some real-time controllers have a physical DIP switch that controls a feature usually referred to as "NOAPP", or no application mode. If this switch is in the "ON" position, LabVIEW Real-Time will not run the EXE automatically.
- Ensure Disable RT Startup App is not selected in NI MAX under the target's System Settings,
- Some devices use hardware DIP switches, while others use the configuration set in System Settings for the device in NI MAX. Check the manual for your device to determine the method your device uses.
- While not all PXI controllers are equipped with a DIP switch option, those that do have it feature the switch internally, making it not visible from the outside.
- Check the IP settings of your device. If the device in question is not connected to a network, the device should not be set to obtain an IP address from DHCP server.
- Note: This is only relevant for Phar Lap ETS and VxWorks controllers.
- To set a static IP address for your controller:
- Detect the device under Remote Systems in National Instruments Measurement & Automation Explorer (MAX).
- Open System Settings, and disable Halt on IP failure.
- Open Network Settings, and assign a static IP address.
- Note: If your controller is set to obtain its IP address from a DHCP server, the EXE will only launch when the controller is able to obtain a valid IP address. If the system must start on boot up without a network connection you can set a static IP. The start-up EXE should then start when the controller is reset regardless of the availability of a network connection.
- Check that your NI-RT.ini (configuration/initialization file) and the lvrt.conf (for Linux RT) are set correctly. RTTarget.LaunchAppAtBoot in NI-RT.ini or in lvrt.conf must be set to true.
- Make sure that you do not have NI VeriStand Engine installed on your RT Target. NI VeriStand Engine is a special Real-Time executable that takes priority over your custom Real-Time Application. Since only one executable can be designated as a Startup Executable, your custom Real-Time Application will not run. If this is installed, open NI MAX, select your RT Target under Remote Systems, right-click Software and select Add/Remove Software to uninstall NI VeriStand Engine from the target.
- Remove all property nodes that reference front panel objects or properties from the VI. In most cases, property nodes that reference front panel objects and properties (such as window position), if used, will prevent a real-time application from executing because a VI's front panel is removed when a real-time executable is compiled.
- For some supported targets, it is possible to use property nodes that reference front panel objects if you Enable Embedded UI .
- If it is not possible to remove property nodes that reference front panel objects and you cannot enable embedded UI, you can enable debugging to include the front panel in the build.
- Open the Build Specifications.
- Navigate to the Advanced tab.
- Check Enable debugging as shown in Figure 2 below.
- Note: This will increase system resource utilization on your real-time controller due to the additional processing required to include and run the application's front panel.
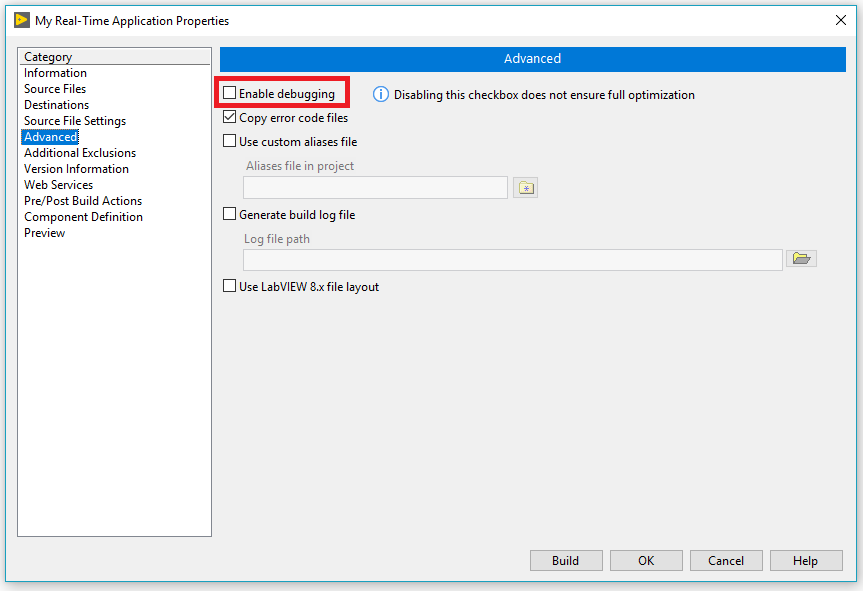
Figure 2: Enable Debugging to Include the Application's Front Panel in the EXE Build
- If your device works when Debugging Tools are Enabled, see if there is an error code by configuring Remote Front Panels for Real-Time targets. To verify sources of errors, ensure that you are wiring errors from points of interest into loops, otherwise, they could be cleared.
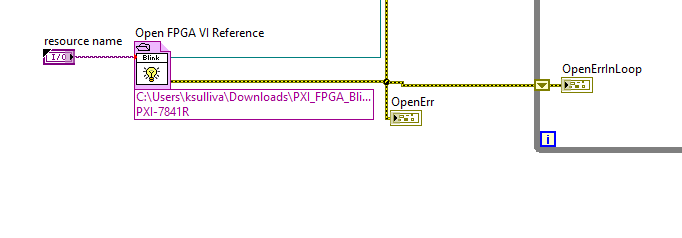
Figure 3: Error Handling with Remote Front Panel
- Ensure that the RT OS is able to start all required services before the start-up application attempts to execute by including a Wait function of 30-60 seconds in the application’s start-up sequence, example in Figure 3 below. This is a good step when using R Series cards with older PXI controllers, as some of their processes take time to start up.
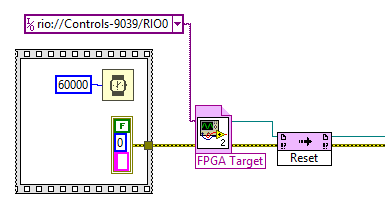
Figure 4: Add Wait Sequence Structure Before Executing RT Code
- Note: This behavior can also occur in large applications that require multiple background processes to load before execution can begin. In these situations, it is possible that the RT OS cannot start all required services before the application attempts to execute (generally the first part is the Open FPGA VI Reference), causing a system to hang or crash. This is commonly seen when utilizing a RIO in hybrid mode and a call is made to the FPGA when before the scan interface has finished loading. A solution in this situation is to include a Wait function in the application's start-up sequence, which should allow the controller to finish loading without overloading the CPU.
- If you are using a Linux RT target, delete all special characters in the name of elements running on the target
- VIs
- Libraries
- Shared Variables
- Files
- Folders
This is because Linux RT can't handle special characters. Besides, you should avoid using 2 bytes characters like Japanese for these elements as Linux OS does not recognize these correctly.
- Remove type definitions from the RT application.
- Open the Application Properties by right-clicking on the EXE in the LabVIEW project.
- Navigate to the Additional Information tab, and check Disconnect type definitions as seen in Figure 4 below.
- Note: Type definitions are used to preserve source code - however, when building/running an executable, this is not a priority. In this case, type definitions can be disconnected to preserve memory usage. The disconnect option is also used as a troubleshooting step when LabVIEW perceives conflicts among different type definitions.
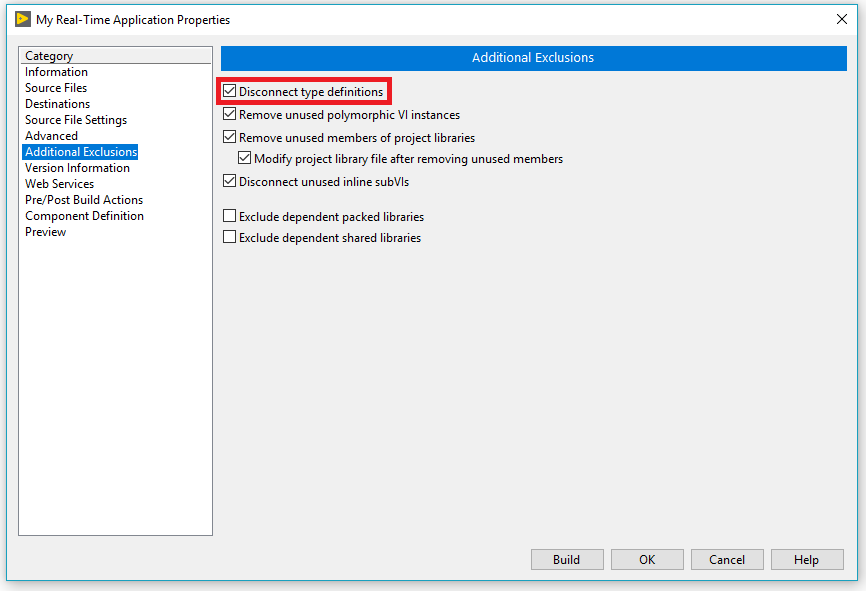
Figure 5: Disconnect Type Definitions in EXE Build in the Application Properties
- If you are using SSE2 Optimization in your compilation, ensure that your target supports SSE2 instructions.
- If your target does not support SSE2 Optimization, disable this option in the Application Properties.
- Navigate to the Advanced category, and uncheck Enable SSE2 Optimization as seen in Figure 5.
- Note: As of LabVIEW 2017, SSE2 optimization can no longer be disabled. You can no longer deploy RT EXEs to targets that do not support SSE2 in LabVIEW 2017 and later.
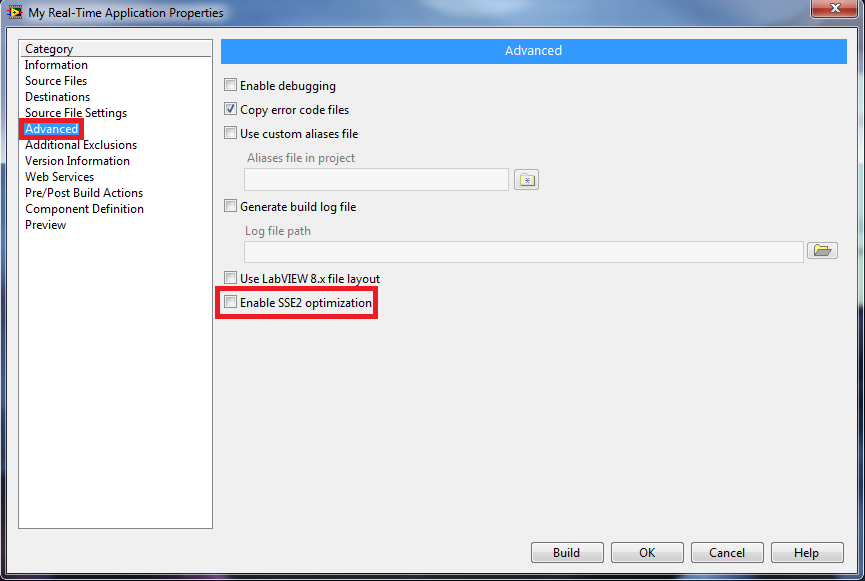
Figure 6: Disable SSE2 Optimization in Application Properties
- If you are using VxWorks targets, be careful when using polymorphic VIs, as these VIs sometimes prevent deployment of the project and cause the cRIO to crash.