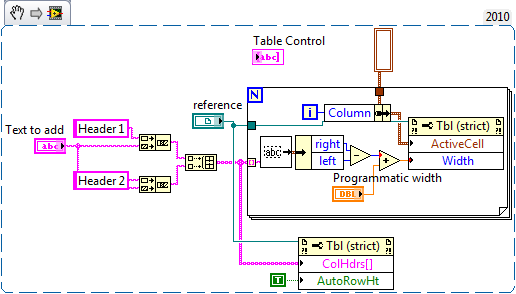
There are two different ways that you can change the width of the columns in a table while a VI is running. First, you can change them by hand with the mouse; and second, you can change them programmatically from the block diagram.
Changing Column Widths by Hand
You can change the column width of tables with the mouse only when column headers are enabled. By default, in LabVIEW, column headers are disabled. Follow these steps to change the column width during runtime:
1. Right-click on the table control and select
Properties.
2. Select the
Appearance category in the Properties window.
3. Check the
Show column headers option.
4. Click
OK.
5. Right-click, again, on the table control and select
Movable Column Separators.
Note: This is only needed when the VI is in run mode. In edit mode, you can change the column code width without having to go through the above mentioned steps.
Changing Column Widths Programmatically
Using a series of property nodes for a table, you can change the width of its columns programmatically. Follow these steps to program your VI to change the column widths:
1. Right-click on the table's terminal on the block diagram and select Create»Property Node»Active Cell»Active Cell.
2. Right-click on the property node and select Change All to Write.
3. Right-click on the input of property node and select Create»Constant. This creates a cluster that tells LabVIEW which cell in the table it should use as the active cell.
4. If you wish, use a Bundle by Name VI from the Cluster, Class, & Variant palette to allow LabVIEW to change the active cell programmatically.
5. Right-click on the table's terminal on the block diagram and select Create»Property Node»Active Cell»Cell Size»Width.
6. Right-click on the property node and select Change All to Write.
7. Wire a numeric constant or control to the input of the Width property node.
See the snippet below for an example VI that changes the first two columns programmatically

Figure 1: Change Column Widths VI