Solution
The steps to solve this issue may vary depending on how you are connecting the RT controller to the host PC. Please refer to the section that applies for your current configuration.
Real-Time Target Connected Through Ethernet Port
NI MAX identifies a remote system as "Connected - Inconsistent IP Settings" when the RT target and the host PC are on different subnets. For example, the Ethernet adapter of the host PC is configured as Link-Local (169.254.x.x) while the RT Ethernet adapter is configured as static with the IP address 10.x.x.x. This issue can also occur if either device is configured with an invalid gateway address — for example, if the gateway is not an address of a computer or router on the local subnet. You can use this external link to confirm if the IP settings for the RT and host are in the same subnet.
This conflicting system setup creates network problems between the host and target, which is why FTP/LabVIEW fails to connect and NI MAX shows the Inconsistent IP Settings message. Under this state, all the information displayed by NI MAX could be inaccurate.
To fix this problem, try the following steps:
- Identify the IP settings for the RT target and the host PC. If you are not sure about their IP configuration, consider the following steps:
- For the host PC, you can open a Command Prompt (CMD) in Windows and run the ipconfig command.
- For the RT target, you can try any of the following options:
- If your RT target has keyboard and monitor inputs, run the ifconfig command. Modify the host Ethernet port configuration to be in the same subnet as the RT. Further instructions can be found in step 2.
- Disconnect the Ethernet cable and use a USB connection instead (if available). By default, the RT target gets the 172.22.11.2 IP address using this method. You may need to remove the target from NI MAX and re-add it using this IP address. At this point, the Inconsistent IP Settings message should disappear and you should be able to configure the Ethernet adapter (further instructions can be found in step 3) so it can be in the same subnet as the host PC. If you still have issues using a USB connection, please check the Real-Time Target Connected Through the USB Device Port section of this article.
- If you are not able to figure out the IP address of the RT target following the steps above, reset the IP address to a default IP address and configure it to use a static IP address on the same subnet as the host machine. Consult your device's operating instructions to determine how to perform an IP reset. After this, the RT target will get a Link-Local configuration (169.254.x.x). Make sure to configure the host Ethernet port as Link-Local (see step 2) so the RT can be properly detected on NI MAX.
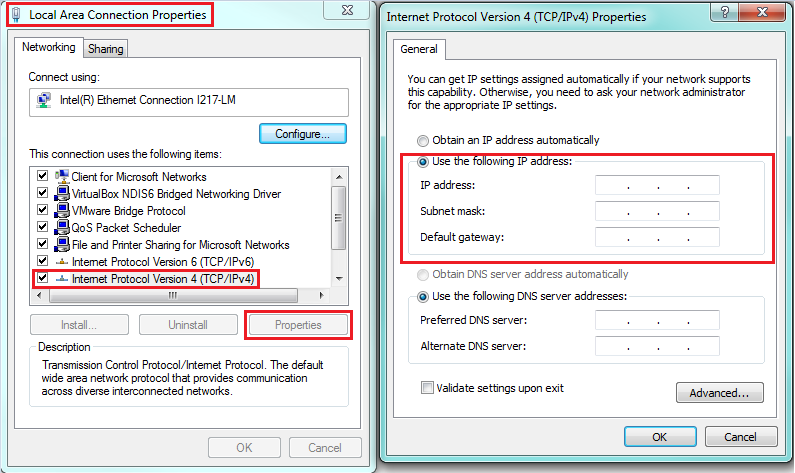
- In options "a" and "c", you were instructed to modify the Ethernet port settings of the host PC. To achieve this, you need to follow these steps.
- Navigate to Control Panel»Network and Internet»Network and Sharing Center» Change Adapter Settings. Right-click the Ethernet adapter that is connected to your RT target and select Properties» Internet Protocol Version 4 (TCP/IPv4).
- Complete the information below so the host PC can be in the same subnet as the RT target. For example, if the RT has the IP address 10.10.100.10 and the subnet mask 255.255.255.0, then you can configure the host PC with IP address 10.10.100.11 and the subnet mask 255.255.255.0. Ensure that the gateway address (if specified) is valid and belongs to a device on the same local subnet. An incorrect gateway can also trigger the Inconsistent IP Settings message.

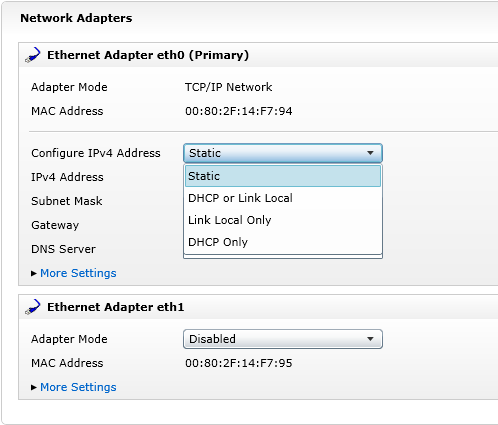
- In option "b", you were instructed to modify the Ethernet port settings of the RT target. To achieve this, you need to follow these steps.
- Navigate to the Network Settings tab of the RT target on NI MAX.
- Complete the information below so the RT target can be in the same subnet as the host. Save the changes after this.

If any of the steps above solved the issue, try the following:
- Delete the device from NI MAX by right-clicking on the remote target in NI MAX and clicking Delete. Refresh NI MAX to allow it to find the remote target, and check if the device still shows "Inconsistent IP Settings." If it is not detected automatically try adding it manually.
- Check and see if the System Configuration versions for the Host and the RT target are different. If this is the case, reinstall the software stack to the Real-Time target so the versions match.
- Perform a format of the real-time controller, resetting the network interfaces to their default state when prompted. If this can't be performed via NI MAX, try doing it through the RT terminal (monitor and keyboard are required).

- If you're having this issue with a PXIe controller it is possible that the PXI Platform services software is corrupt and not allowing NI MAX to correctly connect to the controller. Reinstall PXI Platform Services by following the instructions on Installing, Updating, Repairing, and Removing NI Software .
- If the above steps did not solve the issue, verify whether the System Settings and Network Settings tabs for My System in NI MAX display the correct information about your host PC. If the System Settings Tab is blank and/or the Network Settings tab does not identify the network adapters available on your host PC (My System), refer to the following KB article to address this particular issue as this may be causing the connectivity issues: Blank System Settings Tab in NI Measurement and Automation Explorer (MAX)
Note: The subnet mask of the PC must match the subnet mask of the Real-Time Target. If they do not match, the Inconsistent IP Settings will remain. The subnet mask of the PC can be configured in the same configuration window that the IPv4 Address. Also confirm that the gateway address is valid and corresponds to a device within the same subnet.
Real-Time Target Connected Through the USB Device Port
If NI MAX displays an "Inconsistent IP Settings" message when you connect your RT controller to the host PC through the USB device port on the target, this may suggest that NI-USBLAN adapter is not correctly configured. To fix any communication issues, please follow the steps below:
- When an RT target is connected through USB, a virtual Ethernet interface is created. This means that Windows will detect it as an Ethernet port. Navigate to Control Panel >> Network and Sharing Center >> Change Adapter Settings, to visualize the NI-USBLAN adapter
- To verify if the adapter has the right configuration, right-click on the NI-USBLAN adapter and select Status >> Details. To work correctly and allow connectivity with the controller, DHCP should be enabled on the adapter.
- If DHCP is not enabled, or the connectivity is not working at all, diagnose the connection Windows. To do so, right-click on the adapter and select Diagnose. Follow the instructions from the Windows Network Diagnostics wizard to solve any issues detected.