The LabVIEW code to read from a built-in CJC sensor(s) will differ depending on whether you are:
- Acquiring only from the CJC sensor(s).
- Acquiring from CJC sensor(s) while simultaneously acquiring from the analog input channels.
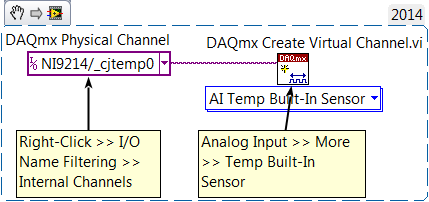
Reading CJC Values Only
 Note:
Note: This image is a LabVIEW snippet, which includes LabVIEW code that you can reuse in your project. To use a snippet, right-click the image, save it to your computer, and drag the file onto your LabVIEW block diagram.
DAQmx Physical Channel Constant
- Right-Click » I/O Name Filtering
- Make sure Internal Channels is checked
- The CJC channels will now be displayed in the drop-down (e.g. _cjtemp0, _cjtemp1).
DAQmx Create Virtual ChannelDrop-Down Menu
Analog Input » More » AI Temp Built-In Sensor
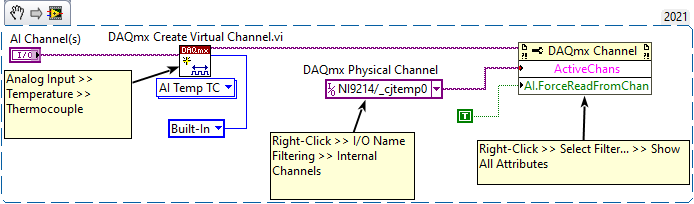
Reading CJC Values and Analog Input Values Simultaneously
By default,
DAQmx Read does not return data from cold-junction compensation channels. As a result, you may encounter
Error -200072 when trying to read from the CJC sensors using
DAQmx Create Virtual Channel as shown above. This occurs due to a conflict in the access of the CJC sensors, since the CJC sensors are also accessed in the
AI Temp TC operation.
Instead, the
Force Read from Channel Property Node is recommended. It forces read operations to return CJC data with the other channel data when set to
TRUE.
 Note:
Note: This image is a LabVIEW snippet, which includes LabVIEW code that you can reuse in your project. To use a snippet, right-click the image, save it to your computer, and drag the file onto your LabVIEW block diagram.
DAQmx Create Virtual ChannelDrop-Down Menu
Analog Input » Temperature » ThermocoupleDAQmx Physical Channel Constant
- Right-Click » I/O Name Filtering
- Make sure Internal Channels is checked
- The CJC channels will now be displayed in the drop-down (e.g. _cjtemp0, _cjtemp1).
DAQmx Channel Property Node
- Right-Click » Select Filter » Show All Attributes
- Set property to Active Channels (if subset).
- Expand Property Node and set second property to Analog Input » Temperature » Advanced » Force Read from Channel.
- Wire in values as shown in snippet above.